• Menu
  • Skip to right header navigation
  • Skip to main content
  • Skip to secondary navigation
  • Skip to primary sidebar
  • Skip to footer

Before Header

  • Facebook
  • Instagram
  • Pinterest
  • RSS
  • Twitter

Turning for Profit | Woodturning | Lathe |

Helping woodturners make more money

  • Blog
  • Projects
    • Library
      • Turned Bowls
      • Christmas Projects
  • Inspiration
  • Make Money
  • Woodturning Techniques
  • Workshop Expertise
    • Splinters
  • Shop
  • Blog
  • Projects
    • Library
      • Turned Bowls
      • Christmas Projects
  • Inspiration
  • Make Money
  • Woodturning Techniques
  • Workshop Expertise
    • Splinters
  • Shop
You are here: Home / Technique / Woodturning – Add a burn line
Woodturning - Add a burn line

Woodturning – Add a burn line

By //  by Robin 18 Comments

divider
This post contains affiliate links. If you use these links to buy something we may earn a commission. Thanks.

How to add a burn line to your woodturning.

Adding a burn line from a wire can accent a turning with a nice touch.  A burn line can emphasize the rim of a goblet or vase.  You can use them to differentiate sizes of crochet hooks or different tatting bobbins.  They can focus your attention on a specific design feature or embellish a simple woodturning.

Woodturning - Add a burn line to your turnings

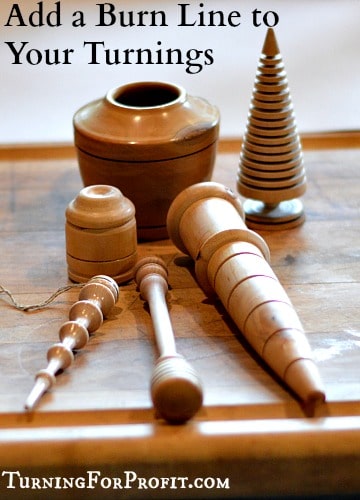
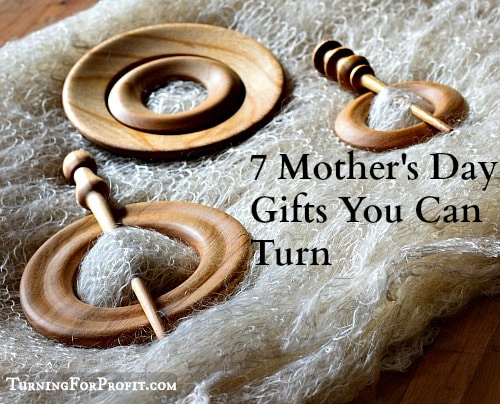
Burn lines are easy to do and add a decorative flare to your turning.  These can be over done in my opinion but my daughter likes lots on anything that I turn for her.  Burn lines can also be useful.  The burn line defines a 1” distance on a Sett Gauge, and defines equal markings on Garden Dibblers as well.

The process is simple.  You cut a groove in your wood with a skew chisel.  Place a wire around your turning and line the wire up with your groove.  With the lathe on, increase the pressure or friction between the wire and the wood.  The wire heats up from the friction and makes a burn line on your turning.

The process of producing a burn line on your woodturning

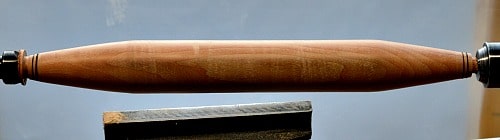
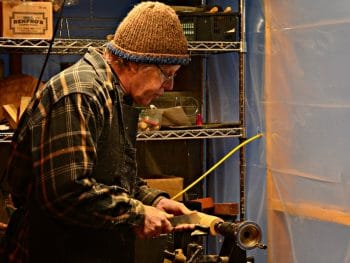
Starting with a plain rolling pin I will add turn burn lines at the end of each handle.

Woodturning - blank rolling pin

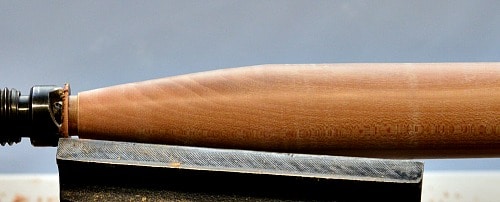
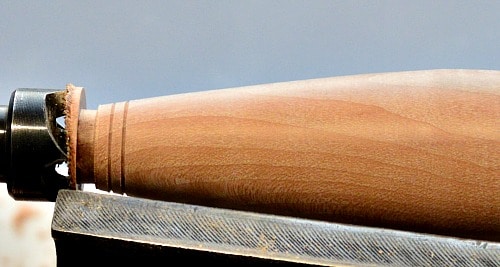
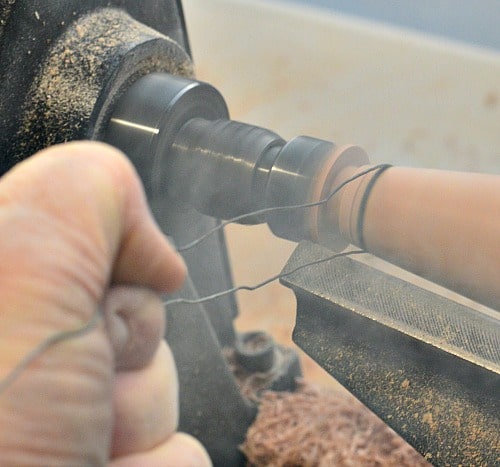
The first step for a burn line is to cut a small groove for the wire to fit into.  I use a skew chisel point to get two small grooves on the end of the rolling pin handle.

Woodturning - initial groove

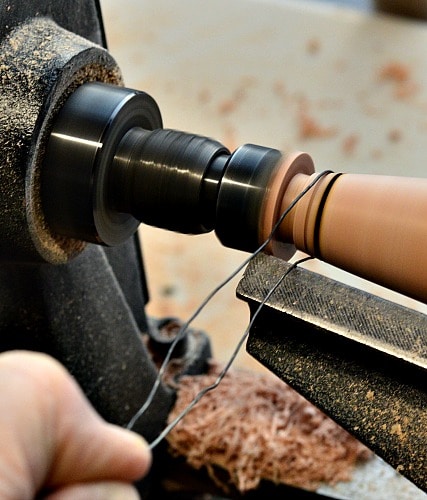
I place the wire around the turning making sure that I don’t catch the wire on the tool rest or other parts of the lathe.

Woodturning - wire around wood only

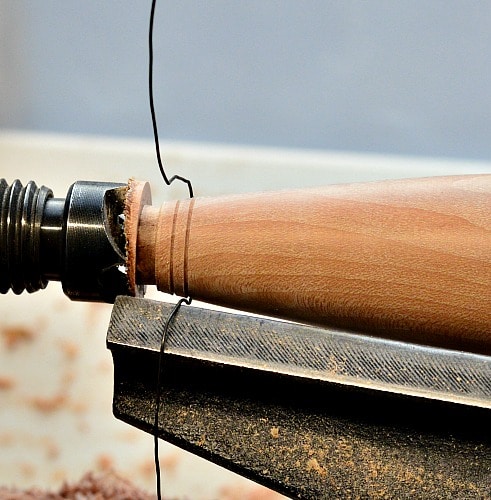
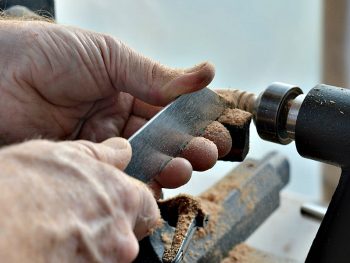
Pull on the wire with the wood spinning until you see the burn line and smoke.  I usually use two hands to control the amount of pressure the wire has on the spinning wood.  This lets you get a dark line without excessive burning.  As I did this one handed in order to take the picture, my first burn is heavier and darker than normal.

Woodturning - Friction = smoke

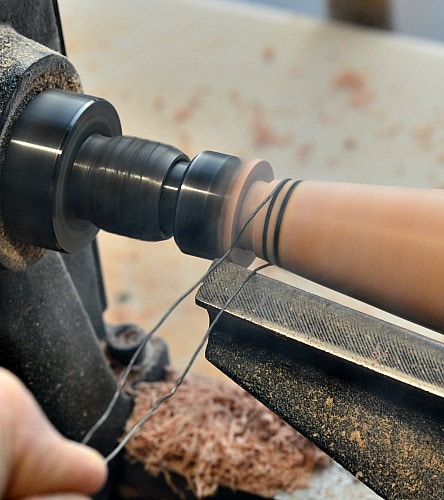
Now the wire is in position for the next burn line.

Woodturning - second burn line ready

Pull the wire so that there is friction which creates burning and smoke.

Woodturning - burning second line

Repeat the process on the other handle.

Woodturning - burn lines on the other end of the handle

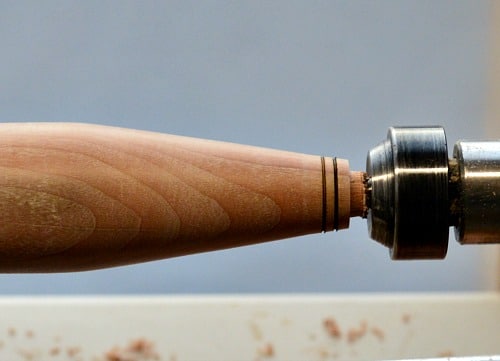
I would do the decorating before sanding the turning.  This allows you to sand away enough wood to leave you with the perfect decoration.  Here’s the finished rolling pin with the burn lines, sanding, and final polish.

Woodturning - Finished Rolling Pin with burn lines

This is a simple technique that you can use repeatedly in your woodturning.  Straight forward to understand, yet they give you a beautiful result on your turning.  On a honey dipper or wooden icicle the burn lines are nice decorations.

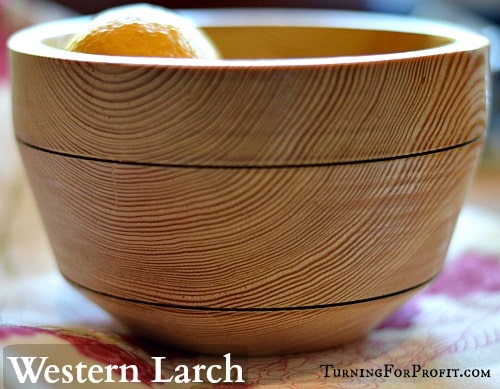
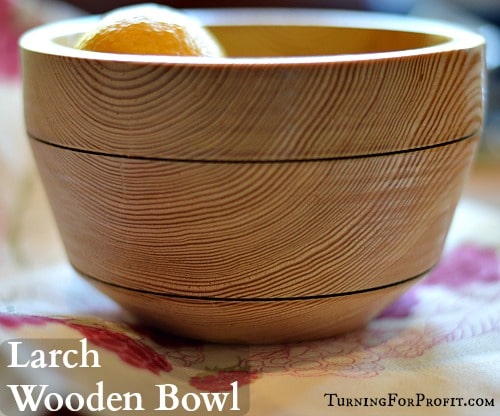
I turned a bowl out of Western Larch.  I liked the idea of three distinct parts for the turning.  So I used a burn line at the transition points.  It was a little harder holding the wire on the bowl and getting enough pressure for the friction burn, but it did work.  I then took fine shavings off with a skew chisel to refine the image of the line.

Woodturning - Larch bowl with burn lines

Burn lines add an accent to your woodturning.  A simple burn line on an icicle decorates the turning without overwhelming the presentation. Woodturning - Icicle with a burn line

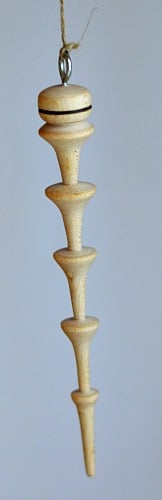
I use a small diameter wire for my turnings.  You could also use worn guitar strings which would give you different wire sizes to try.  If your length of wire is too short and your fingers get hot, wrap the wire around a couple of short pieces of dowel and you will be fine.

When turning some bottle stoppers I wanted a very fine burn line.  Before I had completely finalized the shape of the turning I cut a groove and used the wire to produce a burn line.  To make the burn line smaller I used a skew chisel to take fine cuts until I had a line that was the right thickness for the bottle stopper.  At that point I sanded and finished the turning. Woodturning - Add a burn line

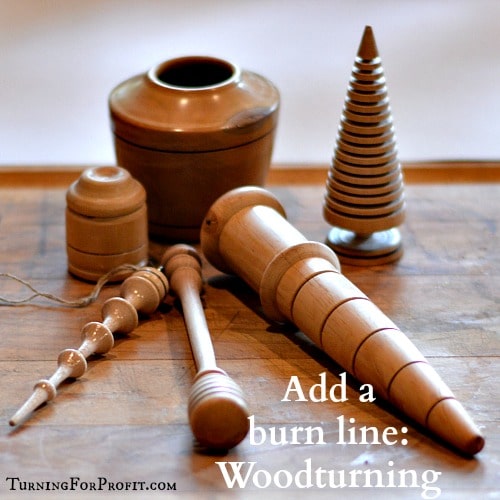
Let me know how you have decorated your turnings.  If you like these posts please sign up for my email newsletter.  It goes out once a week.  It will contain recent posts along with other information that I hope you find helpful and encouraging.  Remember to always turn safely.

Save

Filed Under: Technique, Workshop Tagged With: beginner turners, turning tips, wood turning

Related Posts:

You may also be interested in these posts:
Christmas Projects Title

Christmas Ornaments: Build Your Inventory Fast

Turning Blanks: How to cut dimensional lumber on your table saw to make turning blanks

Turning Blanks from your Table Saw

Shop notes are a great aid in your woodturning projects

Woodturning Shop Notes

Woodturner Shop Safety

9 Shop Safety Tips for Woodturners

Before you start teaching woodturning to children ask yourself 3 important questions

Teaching woodturning to children – 3 preliminary questions

Parting tool is versatile

Parting Tool – More versatile than you thought

Previous Post: « Mothers Day Gifts - Title 7 Gifts for Mom Made on the Lathe
Next Post: Wooden Bowl – Larch Wooden Bowl - Larch Title »

Reader Interactions

Comments

  1. Milton Miller

    February 1, 2018 at 2:03 pm

    would like to burn lines inside of my bowl – how do I do this

    Reply
    • Robin

      February 7, 2018 at 5:25 pm

      Hi Milton,

      I asked the Facebook group and they came up with three ideas you could try.

      1. Small groove then use the edge of a bit of Formica
      2. After you make a groove, bend a small piece of stiff wire to fit the curve and press into the groove to create the burn line. Hold with pliers or make some wooden ends because it will get hot.
      3. I have even created burn marks with fine sandpaper on hardwoods at high speed but you need something besides your hand to hold on to it. Like Mike said most anything that will create friction will work but it will get very hot.

      I’m going to try these out the next time I turn a bowl. Hope they help.

      Reply
  2. Kimberly

    November 16, 2018 at 4:15 pm

    Very new to wood turning. Can you tell me what type of wire you’re using? Your site has been so informative! I just got a lathe, and now I have lots of ideas of some projects to start with. Thanks!

    Reply
    • Robin

      November 18, 2018 at 11:25 pm

      Kimberly, it is just basic wire, nothing special. I have even used a stripped twist tie in a pinch. Several turners really like to use old guitar strings as they come in different diameters. Hope this helps.

      Reply
  3. Mike Bryant

    March 1, 2019 at 10:41 pm

    You should always have handles on your wire because if you have it in your fingers & it catches in the lathe it could tear your finger off.

    Reply
    • Robin

      March 3, 2019 at 9:24 am

      Good point. I pinch the wire between my fingers. I have also never had the wire grab as I was making a burn line.

      Reply
  4. Bob

    July 11, 2016 at 3:47 pm

    I use lots of burn lines in my bowl turnings. Especially on the bottom of the bowl. It is sort of my individualized signature on the bottom. I use a tool that plunges into the bottom and make three rings equal distance apart. I then take one of those precut pieces of melamine that you get from the BBS and plunge it into the grove until it burns a line into the bottom. Gives the viewer the impression that you have not just left the bottom plain but that you thought of doing that little extra to give the turning special interest. Leaves a nice touch.

    Reply
  5. Robindl

    July 11, 2016 at 11:11 pm

    Thanks for the idea Bob. Finishing where people are not likely to look is a sign of a professional. I always check the bottoms of bowls and the undersides of furniture! Like you said you are doing a little bit extra and that makes your work special.

    Reply

Trackbacks

  1. Wooden Bowl - Larch - Turning for Profit says:
    May 3, 2016 at 5:01 pm

    […] most of the burn lines!  However it was easy enough to use a skew chisel to make the grooves and burn the line with wire a second […]

    Reply
  2. Baby Rattle - A Woodturning Project - Turning for Profit says:
    May 25, 2016 at 10:40 pm

    […] can add a burn line like I did when ever you would like when you are turning.  I was basically finished when my […]

    Reply
  3. Woodturning - How to use a Captive Ring Tool - Turning for Profit says:
    June 2, 2016 at 8:49 am

    […] this point I also added burn lines as an additional decorative […]

    Reply
  4. Turning for the Garden: A Garden Dibbler - Turning for Profit says:
    June 2, 2016 at 3:22 pm

    […] shaped then take your skew chisel and mark small grooves every inch along your dibbler. To make a burn line, take a piece of wire and slip it under your turning. Then place the wire in the groove and pull on […]

    Reply
  5. Roughing Gouge - Turning Technique - Turning for Profit says:
    December 14, 2016 at 11:51 pm

    […] Adding a Burn Line […]

    Reply
  6. How to top a good wine - Turning for Profit says:
    February 27, 2017 at 6:47 pm

    […] Burn lines are a great way to decorate small turnings.  I show the steps in this post “Woodturnng – Add a burn line“.Now is the time to sand and finish your bottle stopper.  I leave the tenon for the plastic […]

    Reply
  7. Turn a Fidget Stick for Kids 5 to 85 - Turning for Profit says:
    December 21, 2017 at 9:48 pm

    […] of your skew chisel to make small grooves on the fidget stick.  Then take a piece of thin wire and make a burn line on your stick.  The decorations are up to you.  Have […]

    Reply
  8. How to Turn a Lidded Box - A Woodturning Project - Turning for Profit says:
    January 9, 2018 at 1:16 pm

    […] the base and add embellishments as you see fit. I added a burn line just below the bead.  If you are going to simply part the base from the lathe and be done then […]

    Reply
  9. How to Sharpen Your Competitive Edge - Turning for Profit says:
    January 23, 2018 at 11:30 pm

    […] on specific techniques that you use when you are turning.  So far there are posts on Sanding, Adding a Burn Line, and Using a Captive Ring […]

    Reply
  10. Cremation Urn - A Woodturning Project | Turning for Profit says:
    February 20, 2018 at 10:53 am

    […] round and hit the lever on my tool rest.  This put a dent in the urn.  My wife suggested that I use a burn line to cover the mistake.  Great […]

    Reply

Leave a Reply Cancel reply

Your email address will not be published. Required fields are marked *

CAPTCHA
Refresh

*

Primary Sidebar

Welcome

About me:

Welcome to the Turning For Profit Community! I'm Robin. Turning for Profit is about helping you find hope and joy in your woodturning hobby. It's about projects that fill your inventory and inspire your creativity. It's business help to get you set up and making a profit quickly. If you've always wanted to work from home playing with wood, let me help you realize your dream of Turning for Profit. Read More…

Help for Beginner Woodturners

Learn to use 5 different wood turning tools, with confidence, while you turn 7 projects, building your wood turning skills sequentially.  Includes tips and ideas for marketing your wood turning, when you are ready to move forward.


Footer

Inspiration:

You don’t have to be good to start.  You just have to START to be good. — Joe Sabah

Handmade with Care Stamp

7 Gifts for Men Made on the Lathe

7 Gifts for Men Made on the Lathe
Christmas Projects Title

Christmas Ornaments: Build Your Inventory Fast

Christmas Ornaments: Build Your Inventory Fast
Finished Niddy Noddy with yarn.

Niddy Noddy – A Woodturning Project

Niddy Noddy – A Woodturning Project
  • Start Here
  • About me
  • Contact
  • Privacy Policy
  • Terms and Conditions
  • Disclosure

Site Footer

  • Email
  • Facebook
  • Instagram
  • Pinterest
  • RSS
  • Twitter

Copyright © 2023 · Mai Lifestyle Pro On Genesis Framework · WordPress · Log in