
Getting wood to turn on you lathe can be a challenge. However the off cuts from a building site have great potential as practice turning blanks. Off cuts of commercial 2 x4s make good turning blanks for beginners. The wood is usually fir, spruce, or pine. These are soft woods rather than hard woods. The goal is to practice and improve your turning technique. More about that later, right now we need to get some turning blanks.
Did you just get your lathe? It is exciting to own a lathe but now you need to set it up and turn some wood. How to maintain your wood lathe will tell you all about the different parts of your lathe. What we want to do now is get some wood spinning on that lathe.
Using Commercial Wood
You can pick up off cuts of dimensioned wood from your own projects, maybe a neighbor, or from the house being built just down the street. (Make sure you ask first.) Reject any wood that is green or has repeated indents in the wood. These are treated wood and the preservatives would be toxic to you when you turn. Make sure there are no nails or staples in the wood either. That is not good for your table saw or your turning tools.
For me a standard 2 x 4 is actually 1.5” x 3.5”. What this means is that a 6” long piece of 2×4 will give you two turning blanks. Utilizing pieces that are under a foot in length is taking wood that would be thrown away and using it for a good purpose. If you have short pieces, at least 3.5” in length, then you can make squares to practice your bowl turning techniques with as well.
Getting Started
A quick trip around my shop turned up a couple of long 2x4s and a collection of small ones for squares.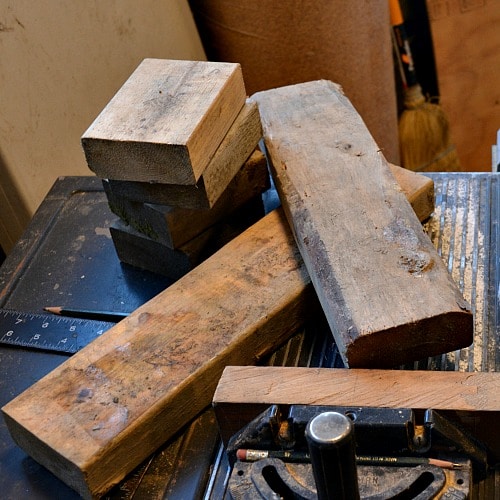
To set the table saw up for spindle turning blanks attach your rip fence. The first step is to stand a 2×4 on edge (the 1.5” side) and place that between your blade and your rip fence. Use the narrow side of the piece of wood to determine the width of the cut. Then all of your ripping of the wood will produce a square (1.5” x 1.5”) turning blank. (Alternatively you could simply rip the 2×4 in half. Your blank would be a rectangle that is almost square. You can easily turn it round on your lathe.)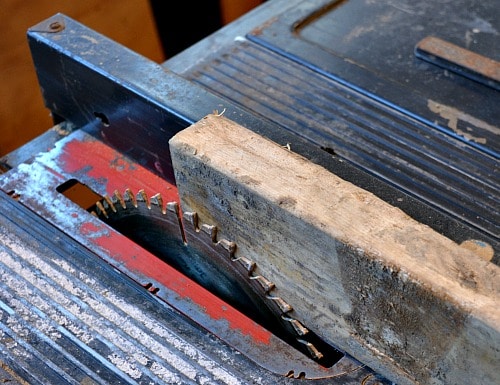
Take the wood away. Turn your saw on. Place the flat side of the 2×4 on the saw and rip off a blank. Use push sticks to keep your fingers well away from the saw blade.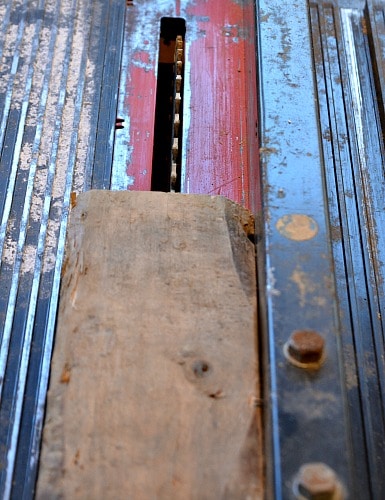
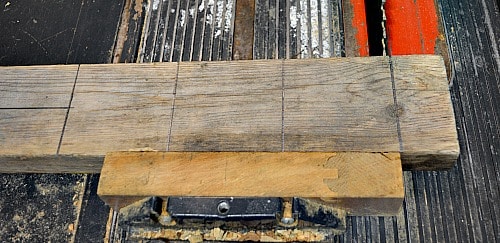
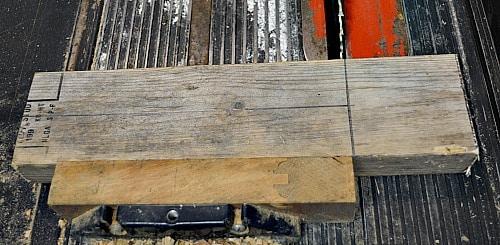
Move the cut blank out of the way. Now put the thicker part of the 2×4 on the table saw and rip a second turning blank. So one 2×4 gives you two blanks. (I left the first cut in the picture but move it off of the table saw before you rip the next one.)
Each length of 2×4 will give you two turning blanks and a thin strip as well.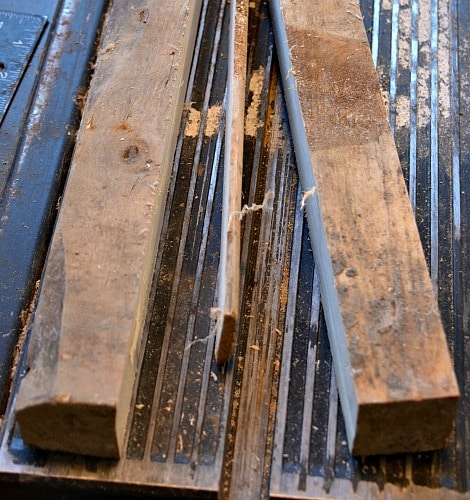
These blanks are quite long so I’m going to cut them down to 7” in length. This is for practice so I would cut them no longer than my tool rest. That way, when you turn, you do not have to move your tool rest all the time.
To cut the spindle blanks to a shorter length move the rip fence away from the table saw blade or remove it altogether. Use your miter gauge to hold the wood and cut the blank to the length you want. You can also cut branches this way as well. Just make sure you are holding the branch securely to your miter gauge. Ensure that the part of the board or branch on the far side of the saw blade is not binding on anything and will simply drop to the top of the table saw once it is cut.
Cutting turning squares
In this case we want to cut a square out of the 2×4 that is 3.5” x 3.5”. An easy way to do this is to mark out the squares on your scrap piece of lumber. It might look something like this.

You can cut the squares off of one end by using your miter gauge to hold the wood as you push it past the blade. Make sure your rip fence is removed so that the wood doesn’t bind on it. On this blank I am trimming off a portion of the end because the wood is split.
Keep on cutting the squares until you are down to the spindle blanks. By doing your squares this way you will have lots of wood to connect with your miter gauge and to keep your hands away from your saw blade. Once the squares are off you can rip the spindle blanks as indicated above.
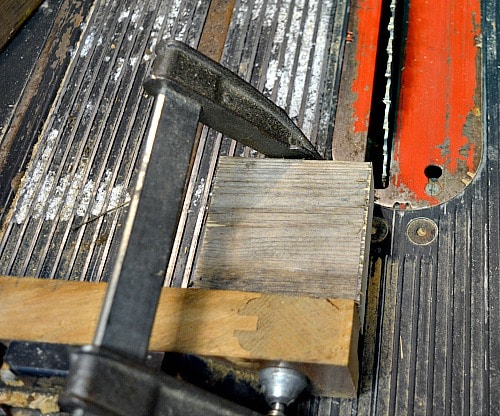
What if you want to turn the 2×4 into just face plate blanks? You can do this but there is very little wood left to hold on to as you can see in the next image. This really puts your hands too close to your saw blade. Find another method to hold the wood to your miter gauge by using a clamp. Make sure the clamp is secure and won’t fall off during the cut.
I am calling these squares bowl blanks because you will be using bowl turning techniques to turn them. I turned a Mason jar lid out of mine.
Marking the center of your turning blanks
For your spindle blanks draw lines from opposite corners. A sharp pencil and a short ruler will make it easier. The intersection is the middle. Use a wood awl to make a hole at the intersection. This will also work even if your blank is a rectangle rather than a square.
For the bowl blanks again draw lines on the face of the blank from opposite corners. Use the awl to mark a hole at the intersection.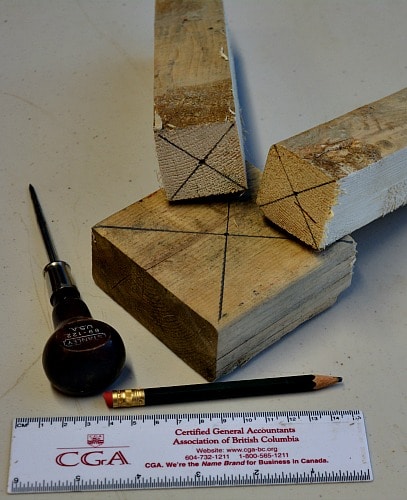
It may seem silly but you will get better at finding the center the more often you do it. Right now close is good enough as you are practicing with this wood anyway.
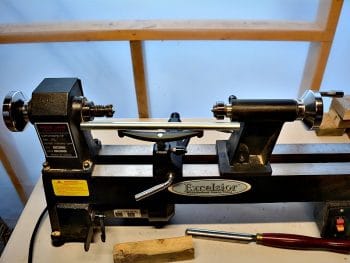
Make sure your lathe is ready for you to use. You have the head stock end that is attached to the motor. Insert a drive spur into the morse taper. Then you should have your banjo with the tool rest inserted. You need to move this to the side when you are putting wood onto the lathe. Finally you have your tail stock. In your tail stock put the live center. You lathe should look like this:
Mount the turning blank on the lathe
Pick up your spindle blank and alight the awl hole with the point on the drive spur. Then bring the tail stock up and align the point on the live center with the awl hole on the other end. Tighten your tail stock so that it won’t move on the lathe. When it is centered, advance the quill fixing the blank between the two points. This is between center, or spindle, turning. The grain in the turning blank is parallel to the axis that the lathe spins on.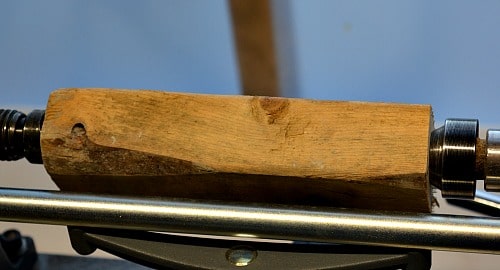
Then bring your tool rest up to the blank. Position the height of the tool rest at the center of the blank. Then rotate the blank by hand to ensure that you do not bind on the tool rest.
Stand to the side when you turn your lathe on. This time the wood is probably secure but sometimes (when I go too fast) things can be loose and the blank can come off of the lathe. Since you don’t know when you are going to leave it loose make it a habit to always stand to the side (out of the line of fire) whenever you turn on your lathe.
Turning the spindle blank round
Use your spindle roughing gouge to start shaping the wood. At this point you just want a fairly even cylinder with all the flat area on the sides removed.
As you can see here the amount removed from the corners of the turning blank is about equal which shows that we centered the blank well. Like I said before this is practice time and if you have three corners being cut but not the fourth then keep cutting and eventually the piece will be round. How to use your roughing gouge will show you more on this tool.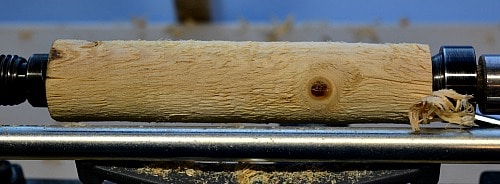
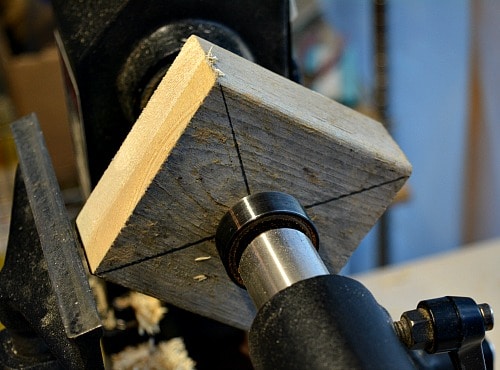
Mount the square blank on the lathe
Pick a block from your square turning blanks and use the same procedure as with the spindle blank. This time you will be bringing the tail stock much closer to your head stock. The 2×4 is only 1 1/2″ thick. Use the awl holes to align the blank in the head stock and tail stock. Extend the quill to tighten the blank in place. You will have to place your tool rest farther away as the corners on your square block extend the farthest away from your lathe’s center.
Note: You could attach a face plate to your square. Place the face plate on the blank and use 1″ wood screws to secure. Remember how deep the screws go into the wood. Secure the blank to the lathe.
Turning the square blank round
Put away the spindle roughing gouge. The fibers of the wood are at right angles compared to spindle turning and the profile of your roughing gouge is not the best. Use your bowl gouge to turn the blank round.
With your bowl gouge, take small bites off of the blank. You are turning a lot of air at this point. When you have a little bit gone stop the lathe and see how you’ve done. If each corner is nibbled the same amount then you were very accurate in marking the centers. If not then you will need to turn a little bit longer to get the blank round.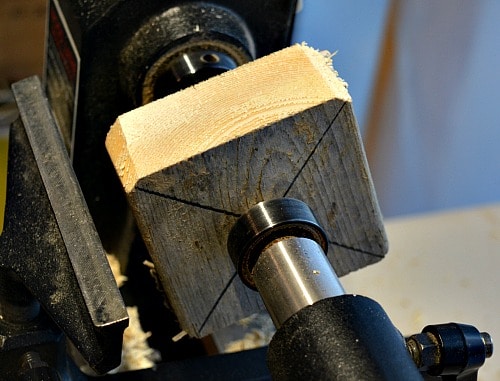
Move your tool rest in as you turn the blank round. To see where to move the tool rest rotate the square blank until a cut portion is by the tool rest. You have cut this wood so you can safely move the tool rest up to that point.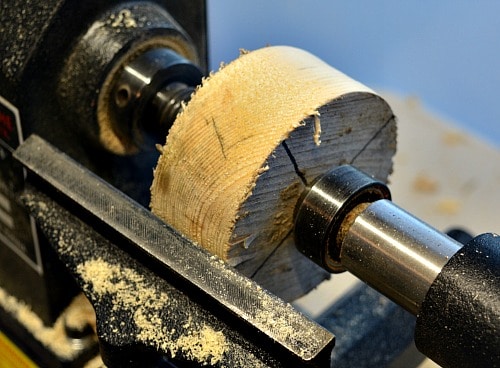
How do I know which tool is best? Well, I’ll let you in on a little secret. I quickly tried to turn a Mason jar lid for a video. Without realizing it (worried too much about the video) I used a roughing gouge by mistake. For this post I used the bowl gouge and the difference was amazing. It took about 2 minutes to turn the blank round compared to 10 minutes in the video. It is much easier and safer to use a bowl gouge when the grain is not in alignment with the lathe. (That is parallel to the axis the lathe is spinning on.)
Improving your technique
Now you have a collection of turning blanks that are round and ready for the next step. You can certainly turn any project you want but you can also try taking different cuts at different angles. If you get a catch then you have learned what won’t work! Keep experimenting and seeing what your tools can do.
For example, if you want to practice with your spindle gouge then put a spindle blank on your lathe and practice making beads and coves. These two shapes, combined with smooth sections in between, are the basis for all types of spindle turning. At one workshop the instructor wanted us to do one side of a bead all of the way along the turning blank. He wanted us to build up a body memory of how to turn the right side of a bead. Then we could work on the left side. This is perfect wood for doing that type of practice.
Turning For Profit
If you have any questions about turning, or the business of turning, please leave me a comment at the bottom of the page.
These posts are for you, the woodturner. If you like turning projects or articles related to the business of turning then please sign up for the Turning For Profit newsletter. Generally it comes out once a week and has links to the current articles, a bit on what I am up to, and usually a question for your response. You can sign up on the right side bar or just a little lower on the page.
I love wood turning and sharing with you. You can follow me on Facebook as well. Thank you for joining me on this woodturning journey. Have fun and remember to turn safely.


[…] Have fun at your lathe. Turning wood is a great way to spend your time and the results make great gifts or even items for personal use. Now you need some wood and to get that on your lathe. Here’s how to do that. […]