Garden Dibbler – A Turned Garden Implement
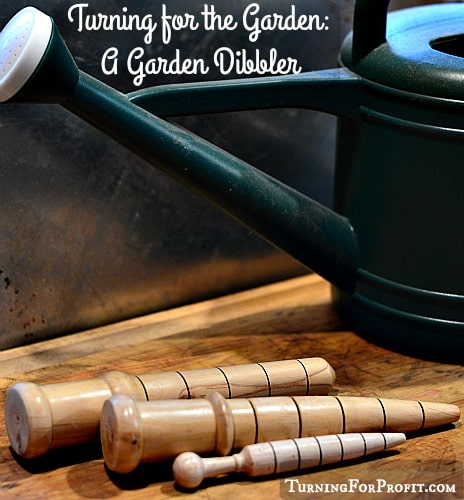
What can measure the correct depth to plant and how far apart to space the seeds? A turned garden dibbler can. This tool is designed to measure the correct depth for seeds, make a hole for transplanting, and can measure the distance between plantings. While one tool can do all of this I’m going to show you how and why you can turn three different dibblers. If you want to be ready for the early farmer’s markets with their bedding plants then this post is for you.
Garden Dibbler Design Considerations
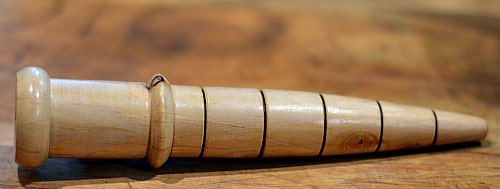
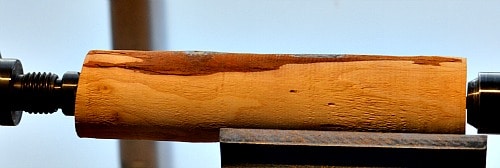
A Dibbler is basically a stick with a pointy end for poking into the garden and for drawing along the dirt to make a trench for seeds. There are usually marks every inch to show how deep into the dirt you are planting or making your trench. Poking the stick in the dirt and moving it in a circular motion makes a bigger hole for larger seeds or for transplanting. A turned dibbler looks much nicer than a stick although I’ve used both!
Searching Pinterest or Google Images will give you a wide range of design shapes and sizes. So I worked with the best gardener I know (my wife!) and came up with three dibblers.
A Seed Planting Garden Dibbler
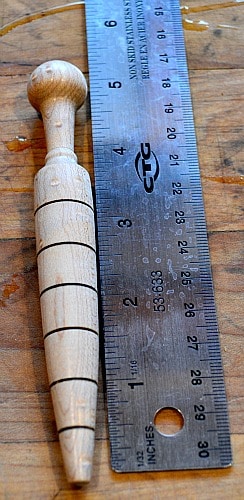
The seed planting dibbler is about 8 inches in length and comes to a fairly fine point. You don’t want it too fine or it will break off in the garden. The markings are 1 inch segments so mine measures up to 5 inches in depth. The fine point means your holes will not be too large for your seed that you are planting and a shallow trench will be fairly narrow. Turning the garden dibbler on its side will give you the planting distance between seeds.
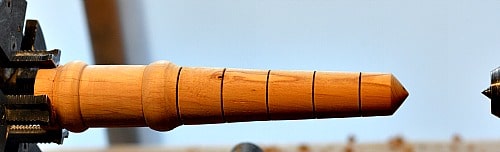
A Transplanting Garden Dibbler
This dibbler is for making holes for your transplants and bedding plants. It could also be used for larger bulbs as well. It is marked out the same as the seed planting dibbler but it is turned to a greater diameter. This makes it easier to create larger holes for the transplants to go into.
A Micro Garden Dibbler
This micro version of a dibbler is like the seed planting one. However it is turned out of a pen blank and only 5 ½ inches long. The marking on this dibbler is every half inch. This dibbler is perfect for finer seeds or for someone who is doing container or balcony gardening.
How to turn a Transplanting Garden Dibbler
A Garden Dibbler is a between centers project. This is a tool to be used so imperfections with the turning are not so significant especially if you are turning one for yourself. This makes it a great project for a beginner turner. I used a narrow parting tool, a skew chisel, a roughing gouge, and a spindle gouge. There is no set way to turn a dibbler so use your tools that you are familiar with and have fun with the project.
The piece of wood should be about 8 to 9 inches long and at least 1 ½ inches in diameter. So a 2 x 4 ripped lengthways in half would give you two turning blanks for this project.
-
Turn the blank round between centers
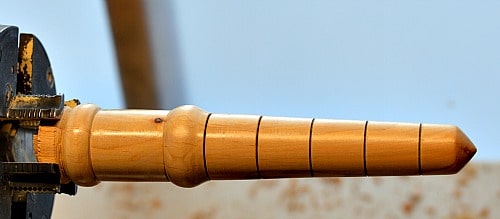
Put a drive spur in your head stock, and a live center in your tail stock, and then mount your blank between them. I used a 1/8th inch parting tool to create a tenon at the handle of the dibbler. The parting tool allows me to get very close to the drive spur as I am forming the tenon. I then use a roughing out gouge to turn the rest of the blank round.
-
Set up the blank in a multi jawed chuck
Remove the drive spur and mount your multi jawed chuck on the lathe. Use the tail stock to center and hold the blank in place as you tighten your chuck. If you don’t have a multi jawed chuck then you can turn your garden dibbler between centers. You will just have to finish the ends of the dibbler by hand.
To make it easier to part the dibbler off of the lathe I leave about a 3/8ths inch space as waste wood by the chuck.
-
Plan the Garden Dibbler
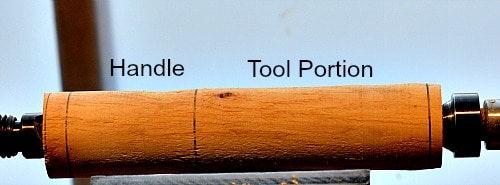
Leave a section for parting off of the lathe near the tail stock. You need to estimate the tip of the dibbler so you can measure out the inch markings. There is no set length for a dibbler so 5 to 7 inches for the tool end is fine. Make the handle comfortable to hold based on your style of turning. Some people have a sphere shape on the end. I turned mine more like handles.
-
Shape each portion on the Dibbler
I would start by tapering the tool from the handle towards the tail stock. I use my skew chisel for the tool portion of the dibbler. This shape determines which type of dibbler you are turning. (One for seeds or one for transplanting.)
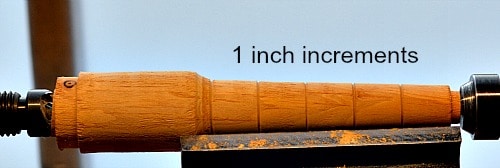
Once you have the tool shaped then take your skew chisel and mark small grooves every inch along your dibbler. To make a burn line, take a piece of wire and slip it under your turning. Then place the wire in the groove and pull on both ends. The friction on the wire will result in a burn mark in the groove. This will make it easier to read the dibbler.
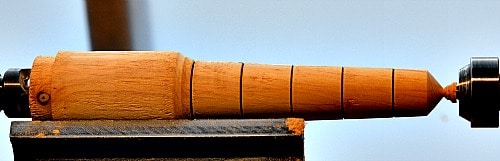
Now shape the handle. Make it comfortable and easy to use. This was where I used my spindle gouge.

-
Part off the tip of the Tool
When the dibbler is shaped to your desire then it is time to separate on the lathe. You can either use your skew chisel to make a rounded tip or you can pull the tail stock back and sand the tip round. The multi-jawed chuck is now holding the dibbler.
(If you are not using a chuck to hold the wood, then you want to do step 6 next. Then come back and part the dibbler off of the lathe. First, almost, part the wood away from the head stock and then fully part the wood off the lathe at the tail stock end.)
-
Sand the Dibbler on the lathe
Depending on how well it went with your skew chisel and your shaping you can start with a finer grit of sand paper. However, if you don’t like the feel of your handle or the tool portion then use a coarse grit like 80 or 120 to quickly smooth out those challenges. Go through the regular sanding process from coarse to fine grit sandpaper. Remember to wipe the dibbler down with a paper towel or soft cloth between each grit. (I like the feel of the extra fine grits but as this will be used in the garden you could stop much earlier.)
When the sanding is completed, finish the dibbler with carnauba wax.
-
Part the Dibbler off of the lathe
I use my narrow parting tool to separate the dibbler off of the lathe. This gives me a smooth finish and a slightly concave base. That is, point your parting tool slightly towards the tail stock. Use your free hand to “catch” the Dibbler as it drops off of the lathe.
-
Sand off the bottom of the Handle
You are almost done. Sand the bottom portion, going through the grits in progression as you did in Step 6. Remember the wax as well.
Selling Turned Dibblers
If you are going to sell your dibblers then you want to set a high level of quality. Yes a dibbler is a good beginner project but if you are going to sell them you want to present a good finished product. Make sure the tool is smooth, and that the markings are 1” or ½” a part. You might want to sand to a finer grit to make the dibbler smoother to the touch. If you do finish your dibbler make sure the finish is non-toxic as it will be used in the garden.
I recommend that you turn a variety of dibblers of each type. Gardeners can be very specific in what they want, or don’t want, in their tools. Understanding how to use a dibbler allows you to explain the advantages and disadvantages of each type. Don’t be afraid to recommend that your customers buy more than one. You may want a micro dibbler in the greenhouse and a seed dibbler for the main garden.

You can be creative and turn dibblers that are similar in shape and handle and then sell them as a set. If you are selling at the farmers’ market here’s two blog posts to help you. What you should do (Mastering the craft show) and what you shouldn’t do (seven mistakes to avoid). You might find that your friends at the farmer’s market who are selling bedding plants would be willing to sell them on a commission basis. This would let you sell your product without having to set up a display.
There is a degree of precision here with the markings and the shape of the dibbler so I would charge a good price. You can always search “garden dibblers” on amazon but remember yours are hand turned and one of a kind. Pricing your products is always a challenge and this article “Nuts and Bolts of Pricing Your Work” looks at the issues involved. Don’t sell yourself short.
Have fun with the project. Also needed at this time of year are small pots for starting seedlings. This project shows you how to turn a form that lets you make newspaper pots.
In researching “dibblers” (cute video on this page) I found out that this is also the name of a very small Australian carnivore. So if any confused Aussies show up you can explain the difference.
Let me know how you make out. I would love to see what you have turned.
Thanks, Robin.


Seems like a great idea, I have been looking one to help in the garden no one has one and some garden departments do not even know what one is. I wish you would give more as to the size of the blank.
Hi Donald, There are three sizes of dibblers in the post. The smallest used a pen blank so 3/4″ x 3/4″. The medium dibbler would be around 1″ x1″ and 6 to 7 inches long. Use a bigger blank if you are making one for transplants and doing bulbs. Hope this helps.