• Menu
  • Skip to right header navigation
  • Skip to main content
  • Skip to secondary navigation
  • Skip to primary sidebar
  • Skip to footer

Before Header

  • Facebook
  • Instagram
  • Pinterest
  • RSS
  • Twitter

Turning for Profit | Woodturning | Lathe |

Helping woodturners make more money

  • Blog
  • Projects
    • Library
      • Turned Bowls
      • Christmas Projects
  • Inspiration
  • Make Money
  • Woodturning Techniques
  • Workshop Expertise
    • Splinters
  • Shop
  • Blog
  • Projects
    • Library
      • Turned Bowls
      • Christmas Projects
  • Inspiration
  • Make Money
  • Woodturning Techniques
  • Workshop Expertise
    • Splinters
  • Shop
You are here: Home / Projects / A Wood Turning Project: Yarn Ball Winder
Ball Winder

A Wood Turning Project: Yarn Ball Winder

By //  by Robin 11 Comments

divider
This post contains affiliate links. If you use these links to buy something we may earn a commission. Thanks.

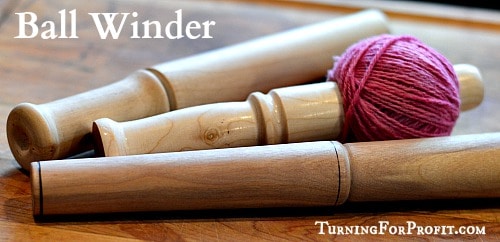
A wooden ball winder makes a great between centers turning project. Sometimes simple tools are the best and this tool is an easy turning project. Enjoy.

A variety of wood turning projects keeps the turner busy and free from boredom.  To try out my new mini-lathe, a wooden ball winder or nostepinne is a good project.  It is between centers turning and requires a good smooth finish on the working portion of the tool.  A Wooden ball winder is called a nostepinne (as well as nostepinde and nystepinne).  In my household it is just called a noste.

noste 1

The working portion is where you wind the yarn creating a center pull ball.  The ball winder has to be smooth so the yarn slides off easily.  The handle can be as fancy or as plain as you wish.  I match the handle to the size of the ball winder that I am turning.  Yes you can have large winders to use for large skeins of yarn or small ones that work with smaller amounts of yarn.

Wood Turning Projects: Wooden Ball Winder

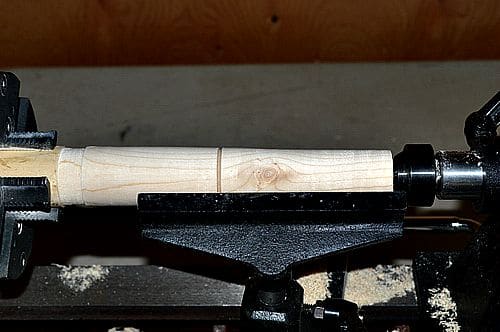
Step 1: Turn blank to round

Put your blank between centers in order to turn the piece round.  You can do this with a drive spur and a live center or you can use your chuck to hold one end in place and a live center in the tail stock.  By using a chuck you can turn the working end of the ball winder on the lathe (see Step 5).  To turn the blank round you can use a roughing gouge, spindle gouge, or skew chisel depending on what you are turning.

Ball winder step 1

Step 2: Mark out the Ball Winder

Decide how big the handle or grip needs to be and how long the working portion of the ball winder will be.  This will affect the size of the balls of yarn you can wind.  It is always a good idea to pencil in the rough dimensions of your wood turning projects so you can get an idea of the size and feel of the turning.  You might want to keep a record of your different sizes on your shop notes.

Ball winder step 2

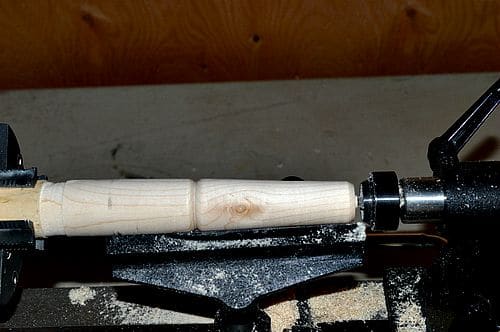
Step 3: Shape and Smooth the Working End

I use a skew chisel for this portion of the turning.  Working from the center to the end (left to right) smooth the surface and create a slight taper towards the end.  Since this is the portion that you wind the ball of yarn on you want it smaller on the end to enable the yarn to slide off easily.  You should define the junction with the skew chisel and round over the end as well.

Shape the tool portion of the ball winder with a slight taper using your skew chisel.

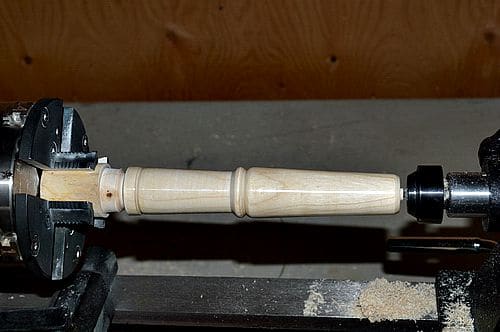
Step 4: Shape the Handle and Finish the Body

The handle or grip for the nostepinne can be your original design.  It just has to fit comfortably in your hand.  Once you are satisfied with the handle then sand and finish your noste to your own taste.  I sanded to 800 grit sandpaper and used carnuaba wax as the finish.

Finish the handle and the tool portion of the noste.

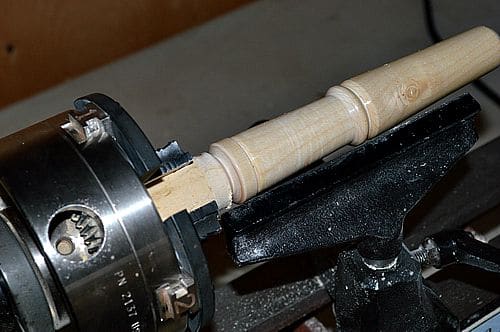
Step 5: Finish the End of the Ball Winder

By putting the blank in a key chuck I can remove the tail stock and finish the working end on the lathe.  This allows you to get a great smooth finish on your ball winder.  The picture shows me supporting the spinning wood as I gently smooth the end with a spindle gouge.

Removing the wooden nub off the end.

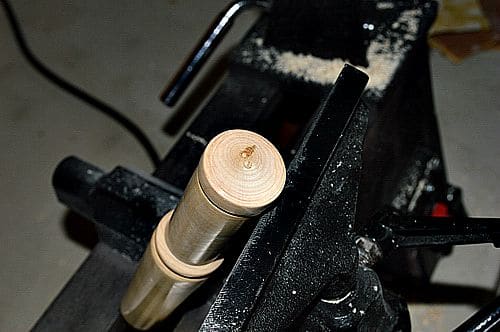
Step 6: Cut the Ball Winder off of the Lathe

Use your hand to support your wood and you use either a parting tool or your skew chisel to part the turning from the lathe.  Take your time and do as much work on the lathe as you can.  Then you won’t have as much hand finishing to do.

Ready to part the ball winder off of the lathe.

Step 7: Complete the Handle

Finish the end by removing the nub, sanding, and finishing the ball winder.  I was able to end up with a very small nub by using a skew chisel and proceeding very slowly in parting the turning from the lathe.

Just a small nub of wood to remove from the handle end.

Step 8: Wrap a Ball of Yarn with Your Wooden Ball Winder

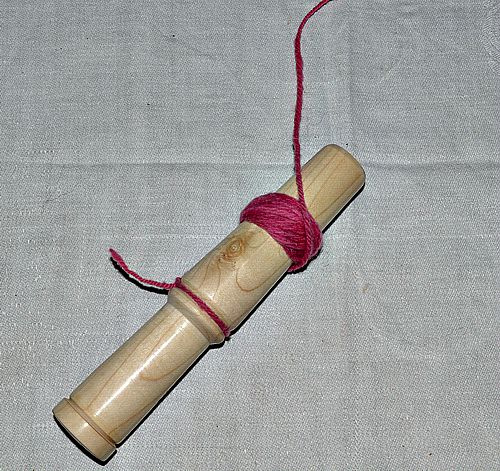
Attach the yarn to the spot between the handle and the working surface.  Then wrap a few turn horizontally half way up the Ball Winder.  Then start going over and under as you wrap the yarn around the Noste.  Slowly turn the tool as you are wrapping.  Here’s a picture part way through the process.

This is how to start wrapping a ball of yarn.

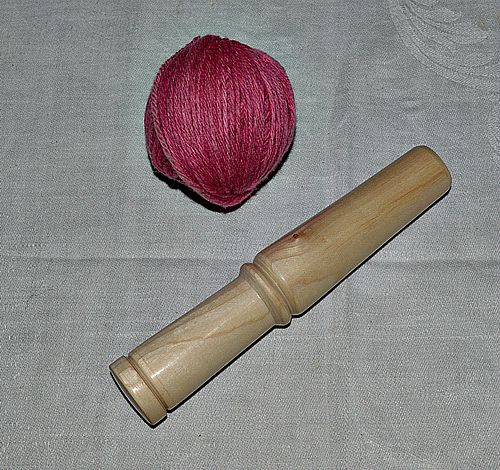
When you have used up all of your yarn untie the yarn from the middle.  This is the part that you pull on to use the yarn.  The yarn then comes from the center of the ball.  This is called a “center pull ball” and it is great for knitters and other crafters because the ball won’t roll all over the place.  Here’s your finished Wooden Ball Winder.  Now you have a new item in your inventory of wood turning projects.

Ball Winder Finished with a sample ball of yarn made on it.

I hope you have enjoyed this Wood Turning Project.  Everyone who knits or crochets could use one of these.

You can also turn other fiber arts tools.  A yarn bowl keeps that yarn ball from rolling about the floor.  A Niddy Noddy is used to make a skein of yarn from either bobbins (from spinning) or from a ball of yarn.  Once you have a skein you can wash the yarn and dye it if you want to.  One more great project is turning a needle case.  You don’t need a large piece of wood for a needle case.  I have made some from pen blanks.

Let me know, in the comments, if you tried this project and how it turned out!


Filed Under: Projects Tagged With: beginner turners, small turnings, turning nostepindes, wood turning, wood turning projects

Related Posts:

You may also be interested in these posts:
Handmade with Care Stamp

7 Gifts for Men Made on the Lathe

Christmas Projects Title

Christmas Ornaments: Build Your Inventory Fast

Finished Niddy Noddy with yarn.

Niddy Noddy – A Woodturning Project

Wooden Kitchen Trivets are easy to turn and love to use.

Wood Trivet – A kitchen turning project

This cup holder extension will help you hold larger coffee cups in your car

Cup Holder Extension

Domino Train Station ready to go

Turn a Mexican Train Dominoes Hub Even If You Are a Beginner

Previous Post: « Sales Receipt Sales Receipt – What to Record
Next Post: Mini Lathe Tip: Changing Pulleys Wood Lathe Pulley Tip »

Reader Interactions

Comments

  1. Rick Kruse

    February 28, 2016 at 12:06 pm

    What size do you turn the end to?

    Reply
    • Robindl

      February 28, 2016 at 7:39 pm

      There is no specific size for a ball winder. You are looking for a winder that will fit comfortably in the hand of the user. Center pull balls work well with about an inch in diameter. You just want to taper the tool so the ball slides off easily.

      Reply

Trackbacks

  1. 5 Reasons That Appearance Matters - Turning for Profit says:
    December 20, 2015 at 9:01 pm

    […] business was fibre. We had wool hats, angora mitts, silk scarves and turned fibre tools. Handmade and artisan designed and crafted. At a craft market you wore clothes that showed off your […]

    Reply
  2. Course Review: Woodturning Basics - Turning for Profit says:
    January 20, 2016 at 12:07 am

    […] The key technique is using the skew chisel to get a very smooth surface. I liked watching Andy take very delicate cuts to achieve the final surface on the roller. I have used his method on turning a ball winder. […]

    Reply
  3. Bird Feeders - Turning Project Part I - Turning for Profit says:
    January 26, 2016 at 11:24 pm

    […] have turned a few items out of the birch wood. Some honey dippers and a ball winder. The wood turns very easily and with a great […]

    Reply
  4. Sett Gauge: A Turning Project - Turning for Profit says:
    February 17, 2016 at 6:00 pm

    […] Sett Gauge goes well with a wooden ball winder and could make a nice set if you matched the wood and the […]

    Reply
  5. Woodturning: Learning from Mistakes - Turning for Profit says:
    March 9, 2016 at 4:33 pm

    […] much wood is left? Can you turn something else from the wood? If your ball winder isn’t working could you turn it into an icicle or a honey dipper? In this case I turned a coin […]

    Reply
  6. 7 Mothers Day Gifts You Can Turn - Turning for Profit says:
    April 18, 2016 at 11:42 pm

    […] Wooden Ball Winder […]

    Reply
  7. Needle Case: A Turned Fiber Project - Turning for Profit says:
    December 19, 2016 at 10:15 pm

    […] turned needle cases are complementary to other fiber art tools like a ball winder or a sett gauge. If you were to use a darning needle with the Knitting Nancy then you could make a […]

    Reply
  8. Diz: A Turned Fiber Tool Project - Turning for Profit says:
    April 4, 2017 at 4:09 pm

    […] Yarn Ball Winder         – ready to make a ball out of any type of yarn […]

    Reply
  9. Shawl Pins: A Turning Project | Turning for Profit says:
    February 21, 2018 at 11:00 pm

    […] thin I could turn the shaft of the pin as well. You can turn other fiber related products like a ball winder, sett gauge, or a needle […]

    Reply

Leave a Reply Cancel reply

Your email address will not be published. Required fields are marked *

CAPTCHA
Refresh

*

Primary Sidebar

Welcome

About me:

Welcome to the Turning For Profit Community! I'm Robin. Turning for Profit is about helping you find hope and joy in your woodturning hobby. It's about projects that fill your inventory and inspire your creativity. It's business help to get you set up and making a profit quickly. If you've always wanted to work from home playing with wood, let me help you realize your dream of Turning for Profit. Read More…

Help for Beginner Woodturners

Learn to use 5 different wood turning tools, with confidence, while you turn 7 projects, building your wood turning skills sequentially.  Includes tips and ideas for marketing your wood turning, when you are ready to move forward.


Footer

Inspiration:

You don’t have to be good to start.  You just have to START to be good. — Joe Sabah

Handmade with Care Stamp

7 Gifts for Men Made on the Lathe

7 Gifts for Men Made on the Lathe
Christmas Projects Title

Christmas Ornaments: Build Your Inventory Fast

Christmas Ornaments: Build Your Inventory Fast
Finished Niddy Noddy with yarn.

Niddy Noddy – A Woodturning Project

Niddy Noddy – A Woodturning Project
  • Start Here
  • About me
  • Contact
  • Privacy Policy
  • Terms and Conditions
  • Disclosure

Site Footer

  • Email
  • Facebook
  • Instagram
  • Pinterest
  • RSS
  • Twitter

Copyright © 2023 · Mai Lifestyle Pro On Genesis Framework · WordPress · Log in