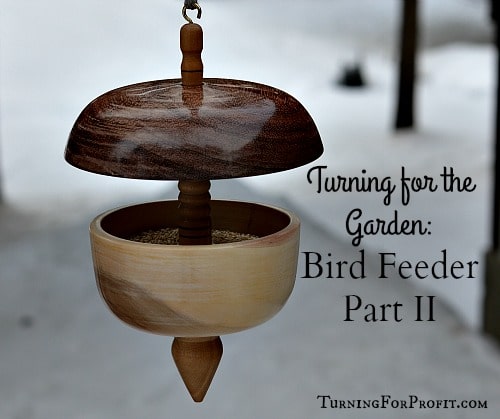
Bird Feeders – Turning Project Part I
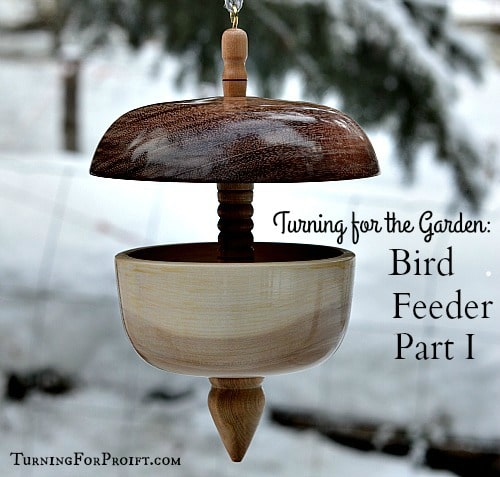
Bird feeders are a great way to watch birds. They can be simple or fancy and made out of many different materials. This turned bird feeder is made out of three wooden parts that fit together to allow the smaller birds access to the food while keeping the food dry and discouraging the larger birds. It is a great project for combining spindle turning and bowl turning.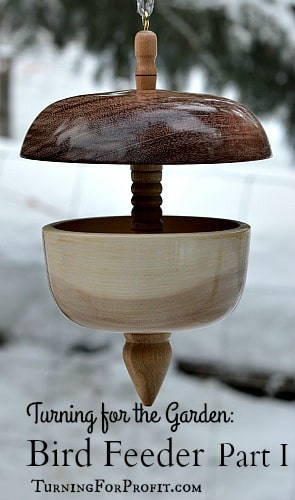
My son has a new house. A bird feeder would make a great house warming present. My first thoughts were rather basic and a bit rustic. A quick internet search revealed a multitude of bird feeders. One picture caught my eye, and the result is this project. The inspiration for this project was from a picture posted by Miklos Mocsenyi on Facebook.
I am also continuing my birch story so if you are anxious to start turning just scroll past the story but if you want to read “Hunting the Elusive Birch Part I” you can follow the link.
The Elusive Birch Part II
It was so much fun finding a paper birch on our property. I called it hunting the elusive birch because when I grew up in the Kootenays there were birch trees all over the place. I guess the conditions have changed and there are not now so many birch trees.
The birch that we found on the property was a standing dead tree but there were saplings of paper birch nearby. It will be a long time before I need to cut down more birch wood. I had lots of birch rounds to haul off of the mountain.
The birch comes into the workshop
The truck was unloaded and the little goat put to bed. All the wood is stacked and ready to be turned. Now we wait for the wood to dry.
Time has passed on and the little goat is grown up and my birch rounds have had a chance to dry. I remember that I need to continue the birch story. What next for the birch? Bowls or spindles?
I have split some of the rounds so that I would have lengths of birch wood for spindle turning. Looks like spindles are first out of the block. The bowls will have to wait. Maybe on my next turned bird feeder.
Back at my lathe
I have turned a few items out of the birch wood. Some honey dippers and a ball winder. The wood turns very easily and with a great finish.
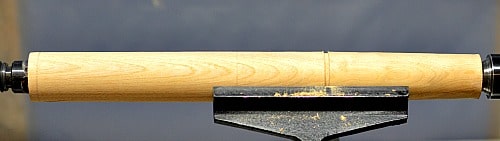
I now have a nice straight piece of birch and a bird feeder project in my head. My project requires good straight grain that will be stable. I will turn a central dowel and two bowls. I am going to use the birch wood to make the dowel.
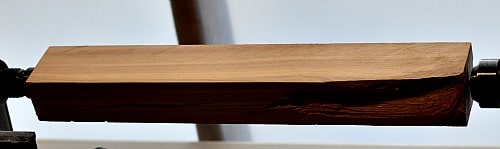
First step is to remove the bark so it doesn’t fly off when I’m turning. Second is a trip out to my table saw. I am taking light cuts because my table saw is old. (That would be another story!) So little by little I trim off two square blanks. They are about 13” in length.
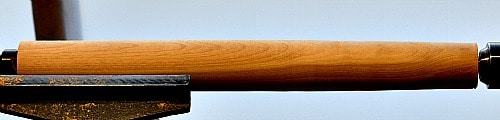
The blank is between centers. I turn it round with a roughing gouge and the blank is just under an inch and a half in diameter. The wood turns beautifully and shows off its lovely grain. Paper birch is a nice fine grain hardwood.
I’m not going to need the whole length for my project so it’s off to the drawing board (scrap paper for me) to figure out the next step in my project. Be back soon.
Okay, I’m back. I need just over 9 inches for the dowel. I part that much off of the lathe and set the shorter piece aside for another project.
Turning Bird Feeders – The Central Dowel
The central dowel is what will hold the bird feeder together. Each bowl will slide over the dowel and rest in the proper position. So the feeder bowl needs to slide down near the bottom of the dowel. The cover bowl will only slide down a little bit. The cover bowl will need to be a larger diameter than the feeder bowl so that the seed will stay dry. The bottom bowl is deeper than the cover bowl so that you can fit more seed in for the birds. I ended up with 1 1/2″ distance between the two bowls. This was the distance I was trying for. I ll have to wait and see how it works with the birds. I may have to make several bird feeders to see what dimensions the birds like.
With the dowel between centers I mark off the waste wood at the ends and the positions for the different sections on the dowel.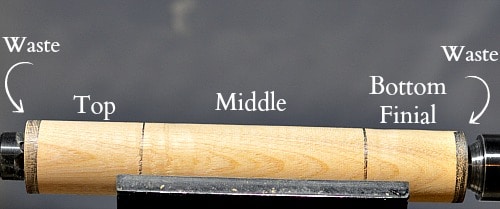
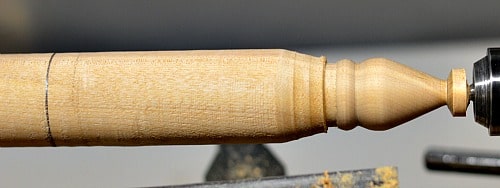
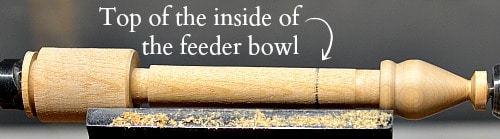
I used a parting tool, just above the bead to define the bottom of the middle section of the dowel. The bottom finial needs to be larger than the hole in the seed bowl. I used a spindle gouge and a skew chisel to shape the bottom finial. This is what will hold the bowl in place so it is turned to just over an inch and is shaped according to your taste.
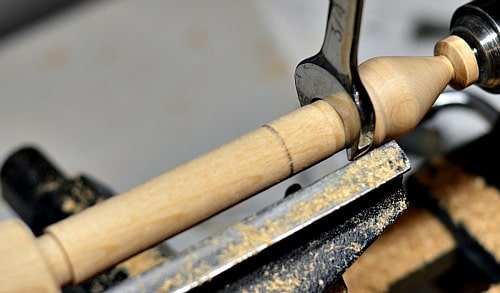
The middle section of the dowel is turned to 3/4” in diameter. I used a roughing gouge to quickly remove wood and then a skew chisel to smooth out the final shape. This will be the size of the hole in the first bowl.
I used a 3/4″ wrench to size the diameter in combination with a skew chisel.
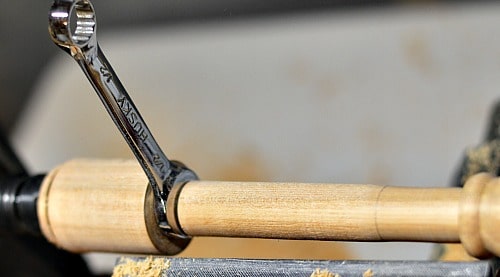
Before I decorated the middle section I quickly sized the top of the dowel down to 1/2” diameter with another wrench and the parting tool.
I marked out the “visual” portion of the dowel, that is, the section not covered by the bottom or top bowl. This is the area that I’ll decorate.

I did three burn lines and three beads. I used a skew chisel to make the grooves for the burn lines, and a spindle gouge to shape the beads. You don’t want to weaken the dowel so the decoration is at the surface.
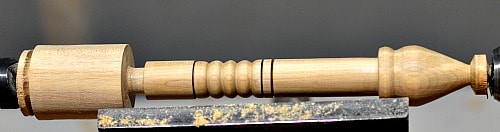
Next I turned the top portion to the 1/2” diameter and again decorated the visual portion that will stick out above the top bowl.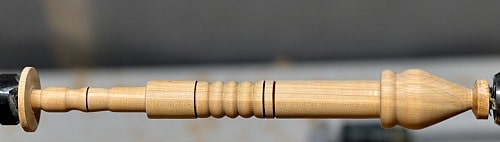
To part the dowel off of the lathe I used a skew chisel and a spindle gouge to shape the two ends. Once the ends were down to about 1/8th of an inch I removed the dowel and used a knife and sand paper to finish the two ends.
The dowel is completed and is just less than 9” in length. In the final pictures you can see that I added a 3/8th inch screw eye. I used a pair of pliers to open the eye into a hook. It doesn’t look like a bird feeder yet. That is coming in part II.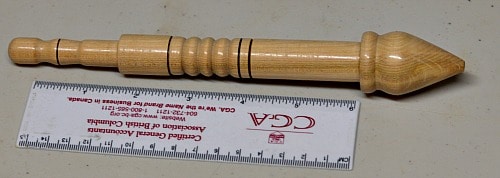
Design considerations for turned bird feeders
The dowel basically has two steps. The bottom supports the first bowl so it has to be larger than the hole drilled into the feed bowl. The bowl then has to slide down the entire length of the dowel. Since I used a 3/4” forstner bit to drill the hole, that was the size the dowel had to be. Make the dowel that diameter so that the bowl is steady for the birds. I talk more about this in Part II.
The next step is for the bowl that serves as a covering for the feed bowl. In this case I drilled the hole 1/2″ in diameter so that is the size of the top portion of the dowel.

I did consider adding a top to the dowel but that would fix both bowls in place. Right now I like the idea of being able to lift the top bowl for putting in the feed. You can also remove the bottom bowl if it needs to be cleaned out.
Carry on to Bird Feeders – Turning Project Part II


Very nice project. I think I am going to make a few of them. I think I will make the top “bowl” a little larger to hopefully prevent or at least make it harder for the squirrels.