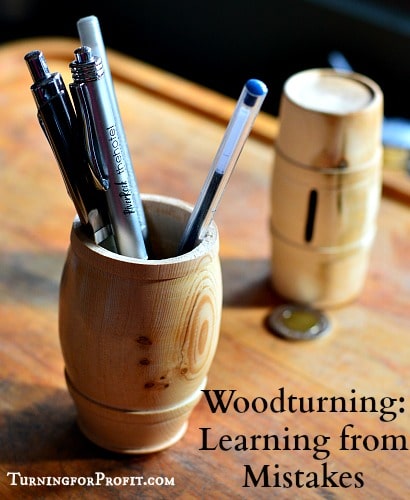
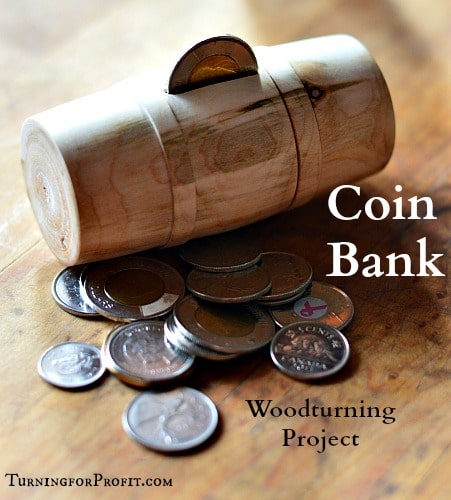
A project. You know exactly what you want to make. You go to the shop to do some awesome woodturning. For me, I had just looked at a project in Woodturning magazine from the UK. Stuart King turned a coin bank and painted it to resemble an antique money box that he found. I liked the idea of making a turned coin bank.
As I headed to my lathe, my idea was to turn a barrel shaped box with a coin slot. Follow me on my project and see the lessons I learned from my mistakes. If you follow these steps you’ll probably make something other than a barrel coin bank, just like I did. I’m going to take you through the process pointing out where I made my mistakes then I will elaborate more at the end of the post.

The Woodturning Process
This follows the basic steps for turning a box on the lathe.
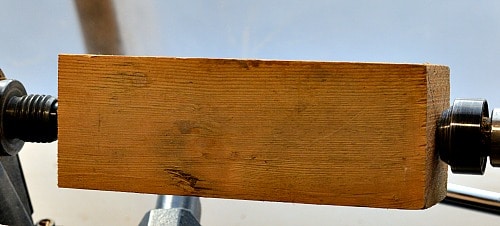
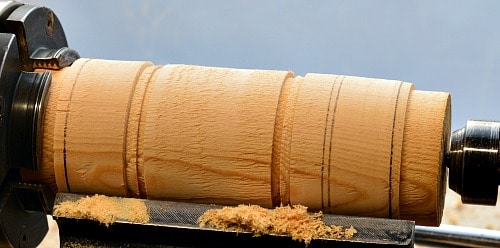
Put your blank on the lathe between your drive spur and live center. Make sure it is large enough to give you a good size box. Make sure the blank doesn’t hit the tail stock before you turn on the lathe.
Turn the blank round and put two tenons at each end of the blank.
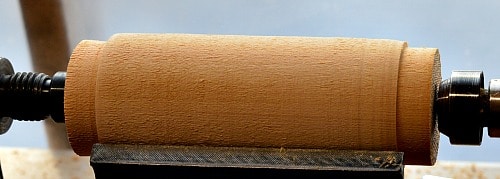
Move your turned blank to your multi-jawed chuck so that it will be held securely when you hollow the box. At this point I laid out the rough shape of the box on the blank.
Mistake number 1
I turned the cap away from the head stock. As a result I had an extra chucking to do. This made it harder to keep the project in the round and all the parts fitting nicely together.
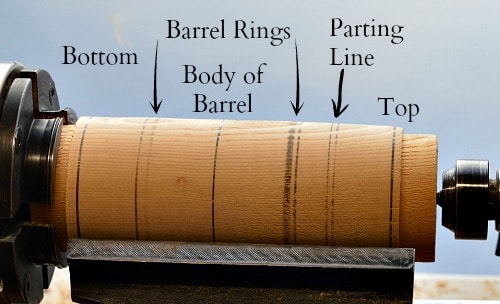
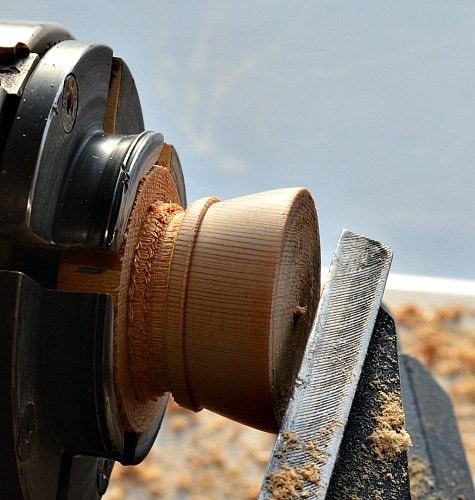
I wanted to put the rings on the barrel so I turned where they would go with a parting tool.
I turned the barrel shape between the rings with a skew chisel. The top of the rings were also lightly shaped with a skew chisel.
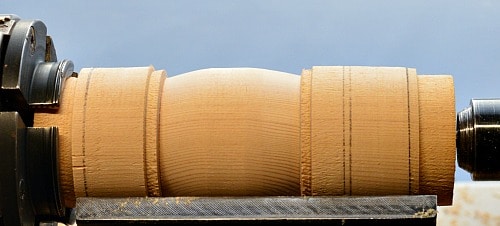
I have now turned the bottom of the barrel, the rough tang for the lid to fit on, and the shape of the lid.
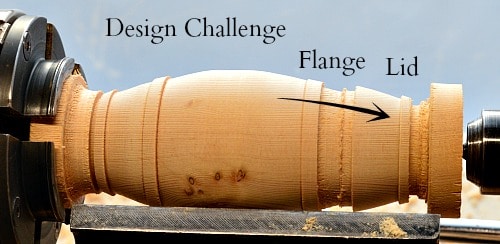
Mistake number 2
I’m beginning to think that this shape is not going to give me a secure lid. The arrow points to the way the lid will fall off of the coin box. Not a good idea.
Now that everything is roughly shaped out I’m going to part off the top of the barrel.
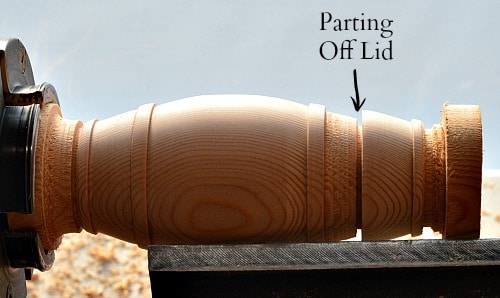
The bottom of the barrel is removed from the chuck so that I can turn the lid of the barrel.
At this point I’m convinced that the way I thought the lid would work actually won’t. I continue to hollow out the top of the barrel. The top walls are quite thin and I was able to get a really thin “bottom” to the cap. I then parted off the top of the barrel from the lathe.
Now I mount the bottom back onto the multi-jawed chuck. Now the mistakes are obvious and I didn’t think to take pictures. I was just trying to make it work.
Mistake number 3
With the bottom mounted in the chuck it is not quite centered and I turned the lathe on. A moment of inattention, resulted in the barrel moving in the chuck and hitting the tool rest. This damaged the top ring of the barrel. Adjust the barrel, and make sure it is secure.
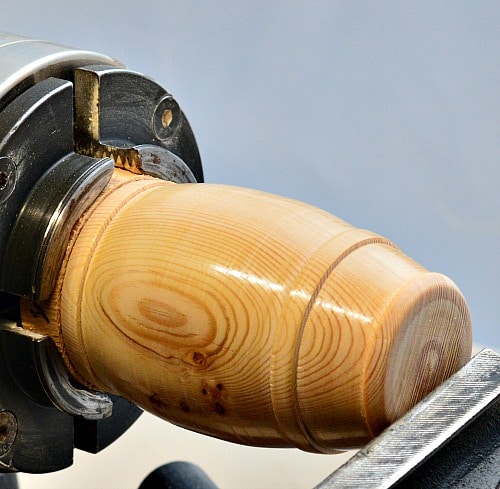
At this point I re-turn the blank to round which changes the shape of the barrel a bit. It is quite tricky to remount the bottom of the barrel exactly as it was before. This is why you should turn the top at the headstock. Then you are putting the bottom in the chuck only once.
I then very carefully shape the flange on the barrel that the top will slide over.
Because the flange is not straight the lid does not fit tight at all. It certainly would not hold anyone’s coins securely. I bring the tail stock up so that I can turn the top of the cap smooth. Using a paper towel to increase the friction I managed to get a decent surface on the top of the lid.
The next step is to hollow out the bottom of the barrel. This worked fairly well. However I made the flange quite thin.
Mistake number 4
When hollowing deeper in the barrel my scrapers caught a couple of times and the flange cracked. I figured out how to hollow better without the tools hitting the edge of the barrel. Part the barrel off of the lathe.
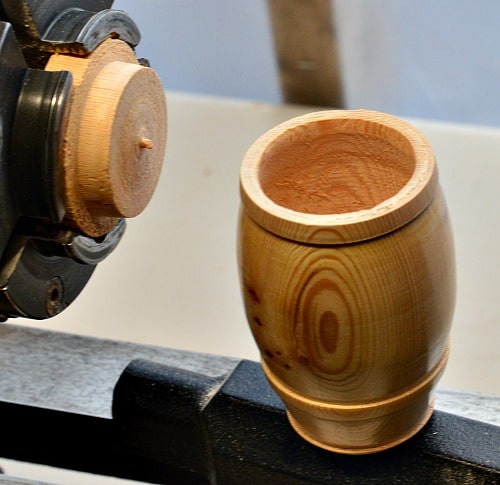
In trying to cleaning up the bottom of the barrel I tried to fit the flange on to a jam chuck and it broke. This is not going to be a coin bank or a barrel with a loose fitting lid. So now what?
Well the bottom looks good like a barrel so the next day I returned to the lathe. I took a knife and cut the flange off of the barrel. You can see the rougher surface on the top of the barrel. I turned a jam chuck on a scrap piece of wood. I then put the barrel on it and turned the bottom smooth.
So now I have a nice barrel that I can put pens in on my desk.
Learning from Mistakes
So in woodturning not everything turns out like you expect. So when you have a challenging time like this at the lathe take a moment to pause and reflect on what you are doing and what happened.
1. What Happened
A. Technique – mistake #4
Sometimes you slip with your technique. For me it was not hollowing properly. The slipping of the scrapers against the flange broke the flange which meant that when I tried to use a jam chuck there was no support there. I have also had catches with my gouges which changed the shape or size of my turning or the decorations on a handle etcetera.
B. Lack of Attention – mistake #3
When I put the barrel into the chuck I did not ensure that it was held securely. The result was a piece knocked out of my ring on the barrel. Not a big deal but I couldn’t turn the ring down because the lid was already shaped and turned. I think I was preoccupied by the design issue and not concentrating on my turning at that point.
C. Design Adjustments – mistakes #1 & #2
The design I had, in my head, for the top of the barrel just would not work. I turned a new coin bank and did the lid differently. (See image below). The initial idea would not have been a good coin bank.
Putting the top of the barrel next to the head stock would have resulted in only one mounting of the bottom of the barrel and not as much adjustment to the turning of the project.
D. Flaw in the wood
This did not happen in this project but sometimes there is a flaw in the wood and as a result you don’t get the results you were hoping for.
2. What to do now
A. Firewood
Well if you have just had a large bowl explode on you there is probably not much to do but to gather up all the pieces. Sometimes this is the way it goes.
B. Practice wood
If a specific technique didn’t work then you might just want to practice on this piece of wood and master the technique. This is something I did often when I was first turning. I would try to make an item out of pine or fir. I knew I would have a catch or two so the item, if it worked, was great, but if not I had fun practicing my turning.
C. Smaller version
When making projects like Christmas Trees or Icicles any catches or problems can usually be turned away and the project is just a bit smaller than what it could have been. When turning bowls and you catch on the rim then you can turn the rim smooth again but your bowl will lose some of its depth.
D. Different project
How much wood is left? Can you turn something else from the wood? If your ball winder isn’t working could you turn it into an icicle or a honey dipper? In this case I turned a coin bank into a pen holder.

3. What did you learn
Mistakes will happen when you are woodturning. Even the experts have off days. The key is to review what happened and learn from your mistakes. In my case I came up with a different way of designing a coin bank. I realized that I need to practice my hollowing techniques on end grain. I also need to focus on each step of the turning process especially when putting wood onto the lathe. Good thing it was a light piece of wood.
I also figured out how to turn the barrel shape easier. Like with the heart vase sometimes it is a good idea to do a practice run first. I guess this became my practice run.
I hope you enjoyed learning with me. If you are not making mistakes woodturning then you are not learning. I guess what we want to do is to be making new mistakes! Let me know how your turning is going and what nuggets you have turned your mistakes into!
If you want to ensure that you get my next project please sign up on my email list. Thanks.


I am not an expert, but I have always been taught to NOT have the work-piece bottom out in the chuck. You should cut a shorter tenon, tapered, and have the face of the jaws flat on the work-piece. The taper does several things. First since most jaws are tapered they will help to hold the piece in the jaws after it is tightened. Second, tightening the tapered jaws against the tapered tenon tends to draw the piece into the chuck. Having the piece bottom out in the jaws will guarantee that you will not be able to re-chuck it correctly.
Also, if you intend to re-chuck the piece you should make a small mark on the wood next to one of the jaws, such as by the one numbered 1, so that you can re-chuck it in the same orientation, thus being more accurate, and the jaws will slip back into their original depressions in the wood.