
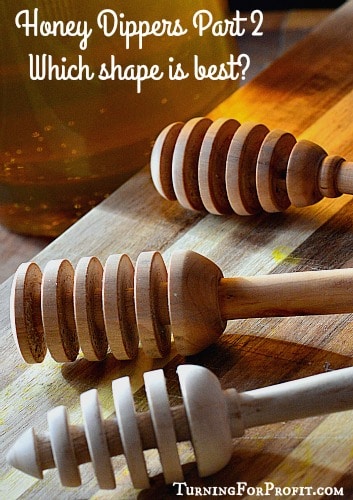
Once I had turned some honey dippers I started to see them all over the place. There were many variations on the simple theme of a honey dipper. The very simple versions were straight with 4 or 5 grooves. I enjoyed turning ones with a bit of a shape, sort of like a rain drop shape. Then on the internet I saw some “bee bum” honey dippers which were turned large on top coming down to a distinct point. Some were close to being spheres in their shape.

How Well Do Honey Dippers Work
The next question was is there any difference in the utility of the shapes? Would one shape hold more or less honey than another shape? Would one shape drip honey longer or shorter than another version? How much honey would remain on the honey dipper after you had dripped most of it off?
The Preparation
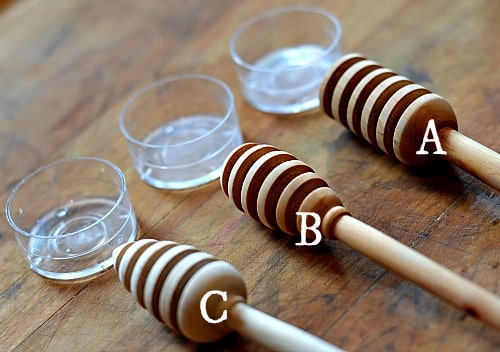
Okay. These are not the most pressing questions in the world. But they were an excuse for me to turn on, and turn, on my lathe! I decided to test three different shapes. Each dipper would have a head of the same length, 5 grooves cut with a 1/8th inch parting tool, and the maximum diameter would be the same for all three dippers. The process for turning honey dippers was outlined in my earlier project post. I turned (A) straight sided dipper, (B) tear shaped dipper, (C) pointed dipper.
The Experiment
Each honey dipper was weighed. I used a balancing kitchen scale that didn’t give me precise measurement to the gram but it did give me an indication of relative weights. So (A) came in at about 11 grams and (B) and (C) were 10 grams.
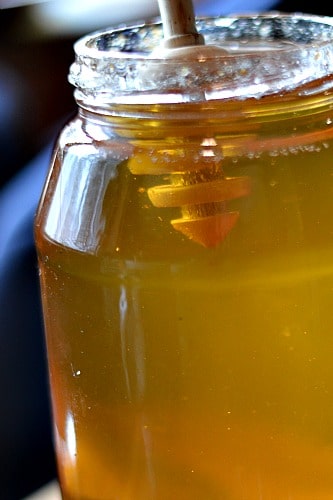
Each dipper was dipped in a honey jar to a point just above the last groove on the head.
A timer was started. At that time the dipper was presented at a slight angle to a small container to drip the honey off of the dipper.
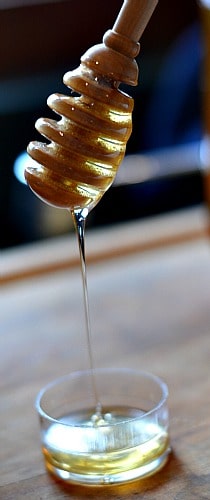
For 30 seconds the honey dripped off the dipper into the container. Then for 2 and ½ minutes the dipper was held over a mug to see how long the honey continued to drip. Once all three dippers had been tested I then measured the weight of the dipper. In order to balance the kitchen scale I could see how much movement was necessary. This told me which dipper held on to the most honey.
The Evaluation
The results of the honey collected in the containers showed the most honey from (A) then (B) and then (C). The line in the container measures a teaspoon of liquid. So (A) gives you about a teaspoon of honey. (B) gave a little less. (C) was about half of (A). So depending on how much honey you like you can choose A, B, or C!
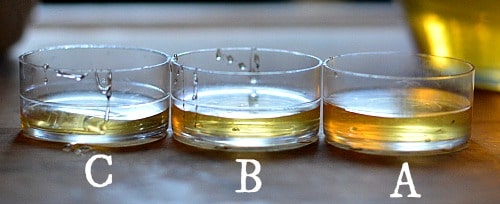
All three dippers dripped honey for the remaining 2 and ½ minutes on the timer so there wasn’t one dipper that was better in letting go of the honey than any other.
I measured the final weight of the dippers, after they were allowed to drain a bit longer. Dipper (A) had more honey still on it than dippers (B) & (C). Dippers (B) and (C) had about the same amount of honey left on them. That would mean if you washed your dipper after use you would lose more honey with dipper (A). On the other hand if you lick your dipper to clean it then Dipper (A) would be your better choice.
Honey Dipper Conclusion
The shape of the dipper does affect the amount of honey you get for tea or for drizzling on toast. The larger the surface area the more honey is retained. I did not test the ability of the dippers to clean out the honey pot (It was way too full). I would think the pointed dipper (C) would be the most awkward to use for cleanup.
So turn a honey dipper you, and your customers like. It is always a great way to get honey in your tea or on your bread.
I also did an informal survey on Facebook asking how people used their honey dippers. Here’s the results:
- Drizzle the honey into the tea and replace the honey dipper back into the jar.
- Swirl the honey in the tea and replace the honey dipper back into the jar.
- Drizzle the honey into the tea, lick the honey dipper clean, wash the dipper, then put it back in the jar.
Now you can talk intelligently with your patrons about the benefits of one honey dipper over the other. Then you can go into the technique of twirling the dipper so you can get even more honey for your tea!
I hope you enjoyed my little excursion into honey dippers. Be inquisitive and keep looking and turning outside the box. Have fun and turn safely.


At the moment I use a metal spoon for my honey and then put it in the basin or dish washer for washing. However not sure what to do with a wooden honey dipper – any thoughts?
Many thanks,
Stuart
Yorkshire UK
Two ideas. You can keep the honey dipper in the jar or you can rinse with hot water and wash with your regular dishes. If you keep it in the jar then just drizzle the honey from the dipper to your tea or toast.
Love these two articles! A honey dipper is the very next thing I planned to turn! I have an unspoken for piece of wild cherry… any thoughts on how this would do for a dipper? Thank you for doing this blog to help those of us venturing into the wilds of trying to earn money for our hobby!!
Thank you for your compliments. I have had no difficulty working with cherry wood. The leaves and bark can be troublesome. I would do a search on prunus wood if you are concerned about it being food safe.
What would be considered as a food safe finish on these.
I would use a food safe oil as a finish. You will be washing the honey dippers fairly often so an oil can be re-applied as needed.
Thank you for this information! I’m just starting on my woodturning journey and wanted to make honey dippers. I’m glad to know what results to expect from different shapes.