Bells are a traditional Christmas ornament. They are part of the Christmas narrative. Jingle bells, sleigh bells, silver bells, I think you get the idea. A turned wooden Christmas bell will be a lovely ornament on the tree.
A bell shape is fairly straight forward and a quick search through my Pinterest board, featurning 100+ Christmas ornaments, shows many different shapes and styles for bells. I wanted to have a clapper in the bell that could “ring” the wood but I wasn’t sure how that would turn out. I think I found a good solution.
Bell design considerations
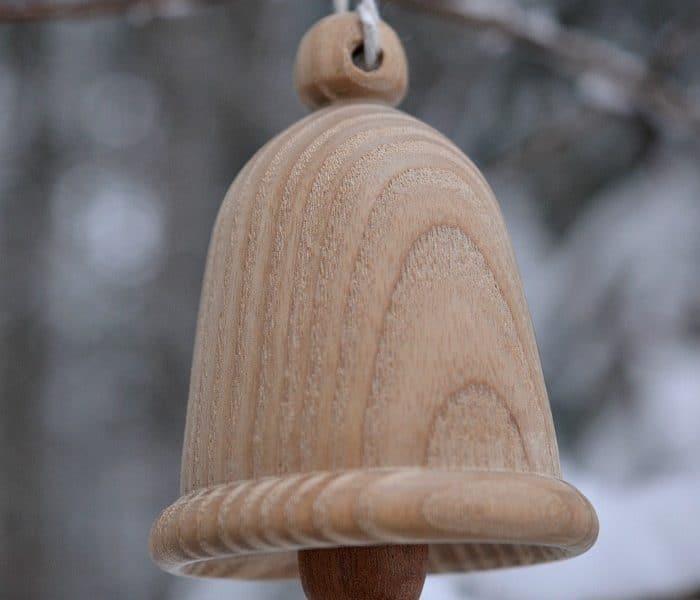
You want a fairly light piece of wood so that the ornament will not be too heavy on the Christmas tree. Most of the bell shapes were taller than they were wide. The body of this bell is just over 2” long and 1 ½” wide. With the knob on top for the string to go through it looks fairly good. Remember that there is no one shape that is perfect for bells just like there is not one “perfect” shape for a snowman!
Hollowing out the bell serves two purposes. It lightens the ornament. This also gives your bell a chance to “ring” once the clapper is in place. I had no specific size for the clapper. As you will see it was turned out of a pen blank. It ended up being ½” in diameter and ¾” long. You can see it in the first image and the size seems appropriate.
Turning a wooden Christmas bell
The wood for this bell is from a wooden sofa that was purchased soon after we got married. That was a long time ago. The sofa is now replaced and the wood will be reused for various wood turning projects.
I mounted the wood between centers and turned the wood round. I also formed a straight cylinder section to fit into the jaws of my wood chuck. Once the chuck was mounted on the lathe I put the wood in the jaws and tightened them.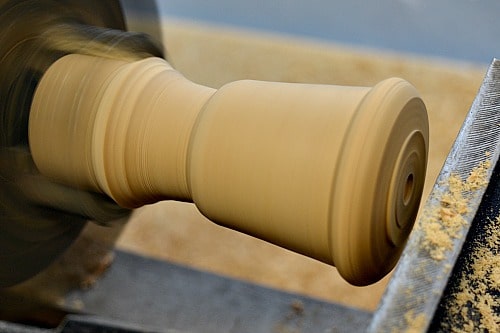
As you can see the bell shape is being developed and I’m about to start hollowing the bell. With the smaller jaws on my chuck I had to be very careful hollowing out the bell. A couple of catches resulted in having to turn the outside of the wood true again once I had completed the hollowing out.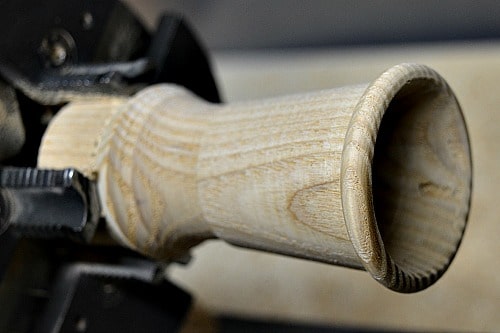
With the hollowing completed I needed to finish the shaping of the outside of the bell. Take your time and ensure that your bell’s wall are the thickness that you want. With practice you can get very thin walls but for a wooden Christmas bell the walls can be a bit thicker without impacting the finished project.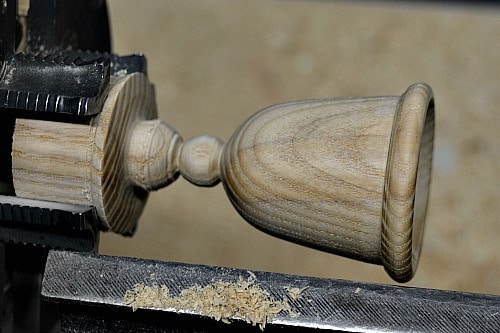
How to attach the clapper to the bell
Getting the clapper attached to the bell had me puzzled for a while. I thought of gluing the string of the clapper to the bell. If the string ever broke then the person who received the bell would have to glue another string in place so I didn’t think that was a good idea. I thought of using a small screw eye in the bell cavity again to attach the string to. This seemed like another finicky idea as well.
Well to attach the bell to the tree you needed a way to slip string or ribbon onto the bell.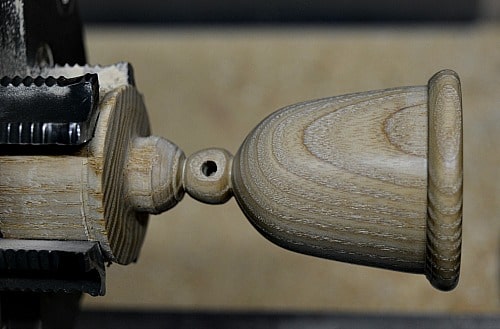
With the lathe turned off (obviously) get your hand drill and drill a small hole into the knob on the top of the bell. I used 9/64” for mine simply because my 1/8” drill bit broke and I haven’t replaced it yet!
Now came the inspiration for the attachment of the clapper. With the bell still on the lathe I put a collet chuck with the 9/64” drill bit into the tail stock. Carefully advance the quill which will drill directly into the center of the bell. (for more detail on using the tail stock and drilling on the lathe please read this post on making needle cases). I measured the distance from the bottom of the bell to the hole that I drilled in the knob. That is how far I drilled into the bell.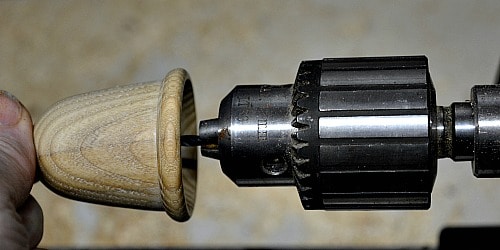
I was so excited to do this that I didn’t take any process pictures. So imagine the woodchuck is holding the bell rather than my hand (like in the previous picture). Then with the lathe on and spinning you advance the quill on the tail stock and this will drill the hole in the bell. The goal is to have these two drilled holes meeting at right angles.
Don’t worry if you don’t have a collet chuck. You can make a small dimple with your bowl gouge at the top of the ball (bottom of your hollowing). Then clamp the drill bit you are using in the jaws of vise grip pliers. Figure out how deep you want to make the hole. Turn the lathe on and then slowly push the drill bit into the dimple in the bell. Now you’ve got your drilled hole!
Time to turn the clapper
Put a small piece of wood into your chuck or between centers on your lathe. Turn it to round.
Then shape a tear drop to be the clapper in your Christmas bell. Use the same drill bit to make a hole in the clapper for the string to go through. 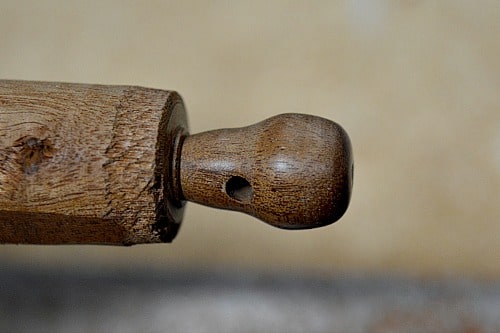
You want the hole to go through the smaller portion of the teardrop so that the clapper will hang properly inside your bell. Remember to sand and finish your clapper to match your Christmas bell.
How to string your Christmas Bell
Use a string to go through the hole in the knob. This string will be the loop that you use for attaching the bell to the Christmas tree. Then using a very small crochet hook reach in from the bottom of the bell, through the small diameter hole, and catch the string that is going through the knob. Pull the string down. Take a second piece of string and make a loop going through the hole in the clapper. When you tie the second string make sure it is going through the first string.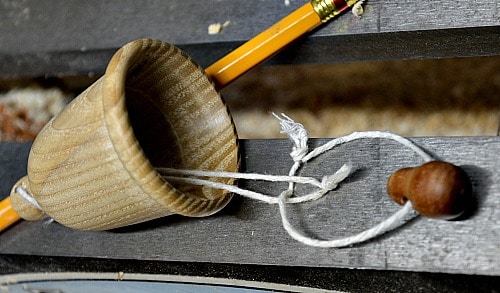
As you can see in the picture the two loops of string are intertwined. You may have to adjust your bell depending on the length of string and where your clapper is hanging within your bell. To test the position of your clapper, pull the first string tight. This will lift the second string into the body of the bell. Then you can see if the clapper is to low or too high. To make an adjustment pull on the clapper and the first string will come out through the bottom of the bell. Now retie your second string and check again.
When I got it right the bell makes a nice sound when the clapper connects with the wood. It isn’t truly a ring as the bell is not made of metal. But it is a very pleasant and quiet sound. So now you have a turned wooden Christmas bell with a fully functioning clapper.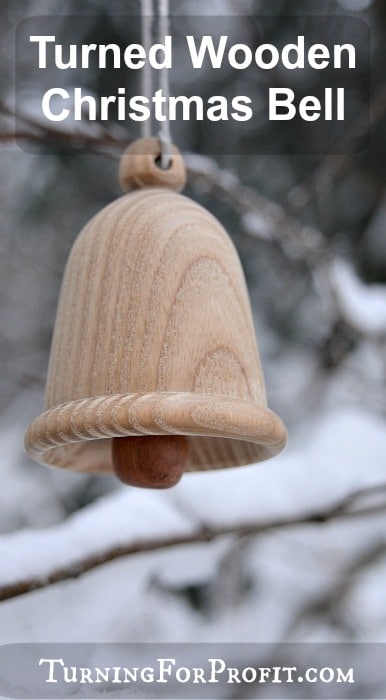
Other Christmas Turning Projects
Turning For Profit has several other Christmas Turning projects that you might enjoy.
The “Perfect” Turned Snowman – sometimes the shape of a turning project can be very challenging. I think snowmen are great projects and don’t have to be “perfect” to be beautiful.
Christmas Trees – here are three different styles of Christmas trees that are easy to turn. You can make them small, as ornaments, or larger, as decorations for the home.
Wooden icicles – are a great ornament and they won’t melt on the carpet either!
Did you have fun turning your wooden Christmas bell? Let me know, in the comments below, how your turning went.


Very nice project and ingenious idea for hanging the clapper. I may try using some left over green braided fishing line – that stuff is made to last thru a LOT of abrasion. I also have some “natural” artificial sinew left over from a knife project that may blend well.
It’s amazing how many leftovers can end up in my shop!
Another way to pull the hanging string down through the clapper hole: Make a loop out of thin wire and push that up through the clapper hole. Then thread the hanging string through the hanging hole and the wire loop.
PS. The wire loop (such as used guitar wire) makes an excellent needle threader for yarn, especially for those with poor eyesight. I glue the wire loop (pinched to a fairly narrow bend) in a wooden handle.
Thanks for sharing the great projects and instructions.
Your Christmas bell is similar to one I have been making for some years. The difference is that I attach the clapper using small metal hook and eye set. I drill a small hole vertically in the top of the clapper and into the inside of the bell. It is a bit a a squeeze getting it in, but the effect is similar to yours. I drill a hole horizontally into the knob as yours, but thread a piece of red ribbon through it.
beautiful
I wish I had your talent