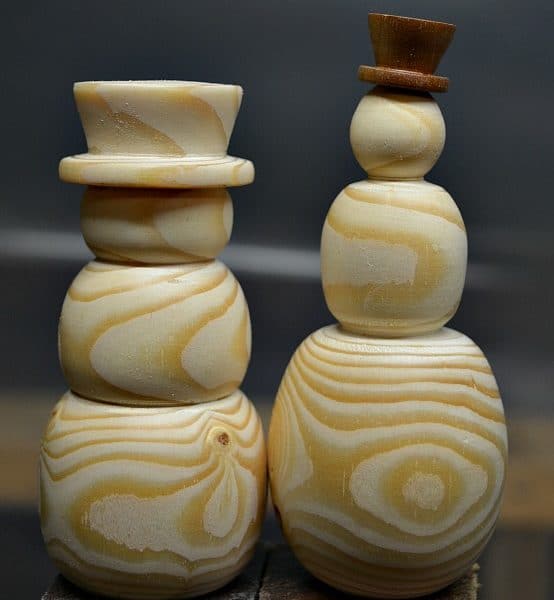
It is December and there is snow on the ground. Do you remember trying to make your first snowman? I can recall thinking the snow was perfect and running out to make a snowman. Then as I rolled the snowball and accumulated snow all of the leaves that hadn’t been raked were sticking to the outside of my snowman! That wasn’t a perfect snowman. So this year I wanted to turn the perfect wooden Snowman.
The Perfect Snowman
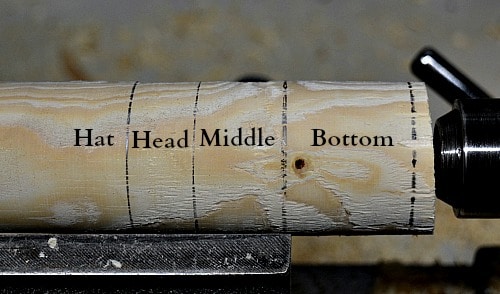
I went on-line and looked for a “Perfect Snowman”. I found one! It was developed by a mathematician in England. It seemed simple enough. He set a size for the bottom of the snowman then the next snowball would be that diameter divided by 1.618 (which is the golden ratio). And the head, of the snowman, would be that ratio divided into the middle section. What this looks like for a turned snowman would be as follows:
Head 1.15 inches
Middle 1.85 inches
Bottom 3.00 inches
This looked plausible and the total height would then be 6 inches which is twice the diameter of the bottom section. Easy to remember and to ensure you have the right sized piece of wood. He is basing the physical dimensions of the snowman on the golden ratio which is supposed to be the relationship between objects that make them attractive. The article went on about other characteristics that snowmen had to have such as the number of buttons and how long the nose needed to be. However, I just wanted to figure out how to turn the perfect wooden snowman.
So let’s go to the lathe.
Turning the “Perfect” Snowman
Sometimes you read the instructions on a turning project and you wonder if it really will turn out. Here we have the dimensions but I’m not that good at seeing the finished project in my head just by looking at the numbers. Turning the snowman will give me a better idea of how it will look.
Using an old piece of pine, I marked the center on each end, mounted it between centers on the lathe, and turned it round with my spindle roughing gouge. Then I marked out each section of the snowman according to the formula. The size of the head looks small to me.
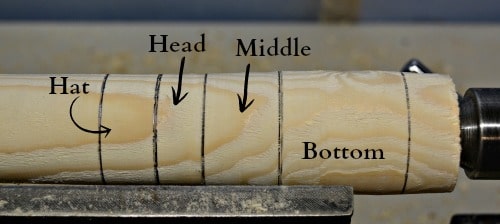
The next step is to turn each section of the snowman down to the appropriate diameter.
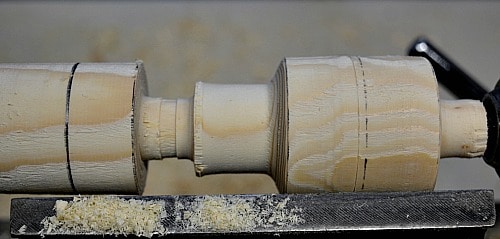
Boy, the head looks small. Well, it is only a piece of pine and we might as well finish. Now to shape the sections of the body.
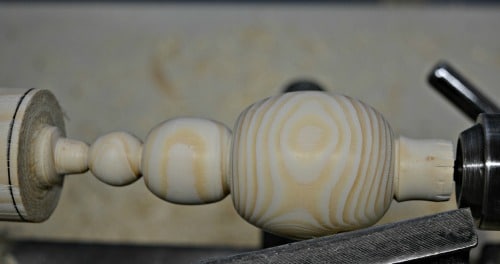
I tried to do a top hat on the snowman but it was a bit awkward to shape it and the hat broke. So the final height and width of each section were fairly close to the numbers above. You can see the finished “snowman” seems to be not what we expect as a “perfect” snowman.
Looking for some inspiration
I also looked at turned snowmen on Pinterest and saw a wide variety of shapes and sized as well as varied styles of finishing the snowmen. You can visit here for a collection of turned snowmen for inspiration on turning your “Perfect” snowman. When you think of it a snowman is three balls of snow, one on top of the other. The bottom usually was as large as you make it as a child. When it couldn’t move you started the next one. That one was a challenge because you had to be able to lift it on to the bottom section. How many times did your bottom snowball crumble when the middle one was put in place? That happened to me a few times.
So now your fingers are cold and wet and really you just want to finish the snowman and go inside for some hot chocolate. So the final snowball was set in place. You might have packed more snow to finish your snowman or just left it as is. Sticks, stones, carrots, etc were used as decorations. You created your snowman and that was the end of it. Everyone else knows it’s a snowman and that is the most important part.
To the drawing board
While the Pinterest pictures were great inspiration they were awkward to use to determine proportions. So I went back to the internet and looked at how to draw a perfect snowman. Of course, the circles used when drawing a snowman overlapped. So then the diameter of the sections should be larger than the height. Using the rough dimensions from a tutorial on how to draw a snowman I came up with:
Part Width Height
Head 3.0 inches 2.5 inches
Middle 4.5 inches 3.5 inches
Bottom 6.0 inches 5.0 inches
The total height would be 11 inches. Using these numbers as proportions I came up with the dimensions for a turned snowman from a piece of wood that was 2” inches in diameter and used them to turn the second snowman.
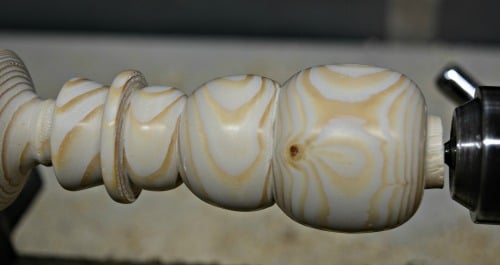
Again the piece of pine was marked and placed between centers, turned round, and then the sections of the snowman were marked on the wood.
So I turned down the diameter of each section and shaped the body pieces. I worked in a hat and estimated where I wanted the brim of the hat on the head. The hat can be any shape you want to be creative with your ideas. You can turn the hat separate from the snowman if you want to as well. I turned a small hat for the first snowman out of a pen blank. This hat can be placed at an angle rather than being perfectly in line.
For sanding, I started with 220 grit and moved through to 800 grit. This is the normal way that I sand my turnings. Remember to wipe with a soft cloth between each grit size. Even before I part this snowman off the lathe it is looking much better than the first “perfect” snowman.
Finishing Decisions
At this point, I’ve got two snowmen. I think I want to turn a few more. Then I’ve got some finishing decisions to make. While I like the wood grain usually there are extras with snowmen. I could wood burn the facial features and a few buttons. You could also paint them white. This might be a good option if you don’t like how the grain patterns are showing up. Then you would paint on additional features as well. Ribbons can be used as scarves and twigs for arms and hands. Be creative and have fun.
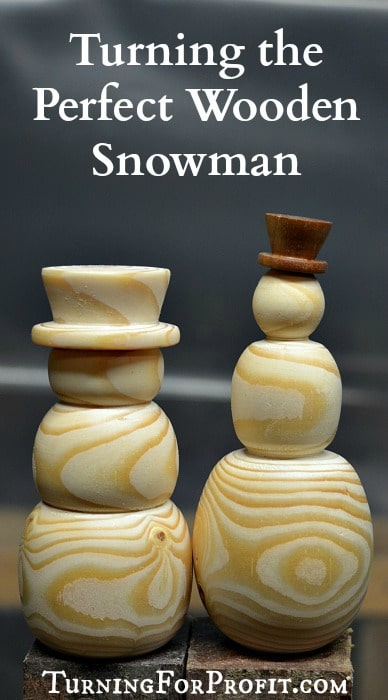
Well, I’m not sure that I’ve found the solution to the “perfect” turned wooden snowman. I think you can have fun and create all kinds of shapes and sizes. Here are a couple of other Christmas projects that you might like to turn. A turned Christmas tree and a wooden icicle.
Be creative and have fun at the lathe. Please join my woodturner’s group “Woodturning Entrepreneur” and share the snowmen and other projects you have turned. Remember when you turn to turn safely!


How can you get a 6” diameter base out of a 2” block?
Hi David. The 6″ diameter was for a drawn snowman. I used it to get the proportions (top/middle/bottom). Obviously you get less than 2″ for the diameter out of a 2″ block. Thanks for your comment. Robin