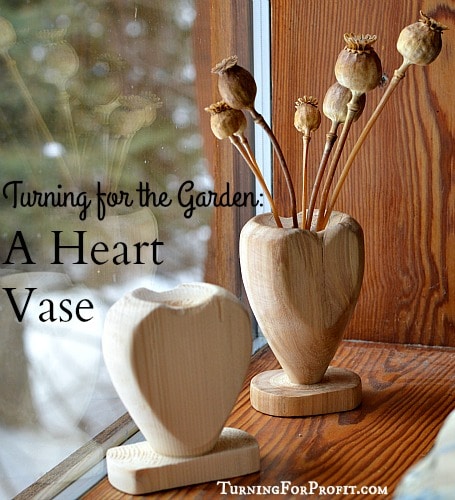
Heart Vase: A Turning Project
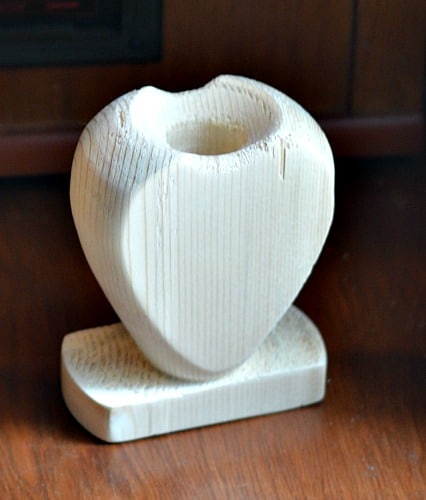
A heart vase makes a great gift for Valentine’s Day. The trick to this vase is the heart shape turned on a thinner piece of wood. Because you do not turn the entire blank round you have the indentation for the heart at the top of the vase. To emphasize the dip in the center of the heart you can carve the top just like I did.

Now you and I might both call this vase a weed pot. That is what turners call a small vase to hold dried flowers or grasses. However, when I did my key word research you can guess what “weed pot” turned up on Google. Well you can call it a weed pot but for this post I’ll have to use “heart vase”.
General Product Ideas
A heart shape will make the vase special. So like most weed pots, this vase is perfect for young children to use for picked wildflowers for Mom. This heart vase is a bit rustic in its character and would be suitable for an outdoor situation like a back patio or the cottage / camper. Of course anyone can use the vase to give flowers to their sweetheart.
If you are selling turned goods at the Farmers’ Market then this might be a lower price point for your booth. I would pick local “weeds” for your display at the market. Do not pick rare or endangered plants for your display; that would give the wrong impression!
Design Considerations
I will be turning a 1” diameter hole in the center, 3” in depth. This will accommodate a stainless steel insert that would allow you to put the flowers in water. You don’t have to do this. Drill a hole that is appropriate to the size of wood you are turning. If you don’t add the insert then the vase will still be suitable for dried flowers. The addition of the insert could give you two price points for the same product.
Adding an insert with water will make the vase a bit heavier which will give it more stability. However the base that is being turned is still quite narrow. Another design option would be to turn a 1” tenon on the bottom of the vase and glue that into a turned base which would be round and give much more stability to the vase. You could also use contrasting wood for the bottom which will up the value of your work.
The tip of the heart can be altered based on your turning preferences. A rough and ready heart vase should be moderately thick at the base. My vase is about 3/4″ in diameter and the vase feels quite stable. If you were turning for a show you could have a very thin point and dried flowers to make a very stunning presentation.
The shape of the heart is also up to you. There is no standardized shape for a heart. So tall and thin, short and wide, or somewhere in between, the choice is yours.
To see if this project would work I turned a sample heart vase in fir. The blank was 1.5” thick. The result turned out okay so I prepared a birch blank for the actual project. The challenge with the thinner vase was that the end would wiggle in the jaws of the chuck as it was held with only two jaws. I stabilized it by using the tail stock and drill bit to keep the vase steady. The heart shape was obvious but more care was needed in turning the blank.
Turning Process
For this project you are going to turn a rectangular blank. This means that you will be turning air all the time. Any quick movements can result in a catch as there is not always wood present to rub the bevel on. You need to be slow and steady to get a good cut and finish on your vase. Don’t rush the tool on this one.
I used a spindle gouge to do the rough turning and the shaping for the top of the heart. Along the body of the vase I used a skew chisel taking very light cuts to get as smooth a finish as I could.
Preparation of blank
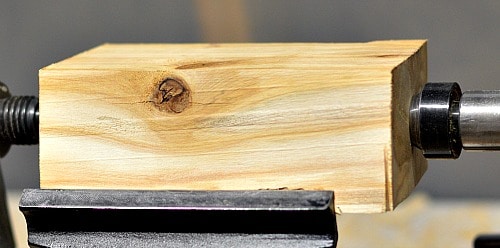
Prepare your blank to suitable dimensions. My blank was 2.5” thick, 3” wide, and about 7” long. To make the vase look good you need to be in the exact center of your blank. For me I needed a point that was 1 1/4″ in from each side. Because of the way we are shaping the heart vase any variance between the two sides will be obvious. A little bit of extra care here will greatly improve your finished product.
Turning blank round
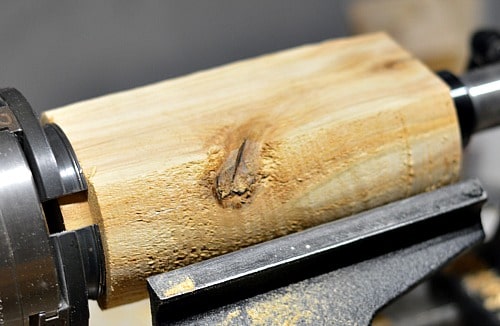
Insert the blank between centers based on your marks.
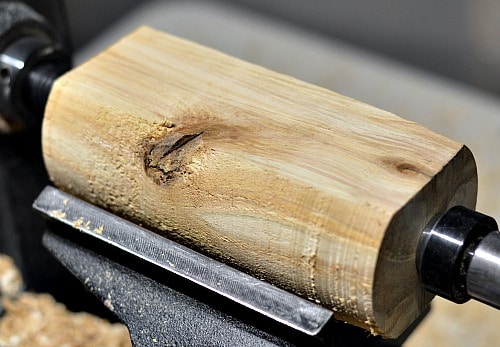
Practice your cuts here, when you are just rounding out the general shape. This gives you practice cutting “air”.
Cut a Tenon on the Blank
Use a parting tool to cut a tenon on the base of the heart vase. This will hold the vase in a multi-jawed chuck so that you will be able to shape the top.
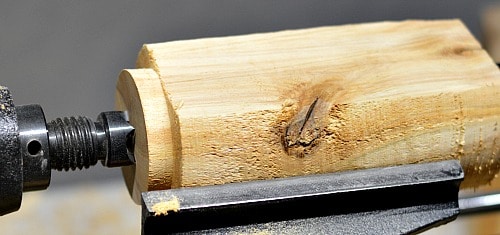
This is where you need to be very careful. A thicker vase gives you more support on the tenon by having more contact with the jaws of the chuck. A thinner vase can move around as there is less contact with the chuck jaws.
Marking and design choices
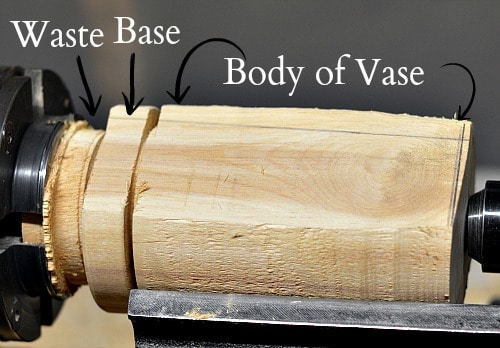
At this point I mark out the waste wood at the bottom of the vase, the base of the vase, and the body of the vase. This gives me a spatial idea of how everything will fit together.
Shaping the heart vase body
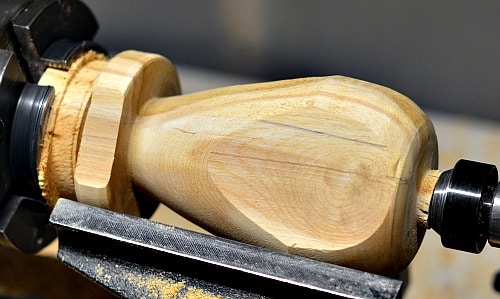
Use the tail stock to give you extra support. Now you can shape the base and body of the vase.
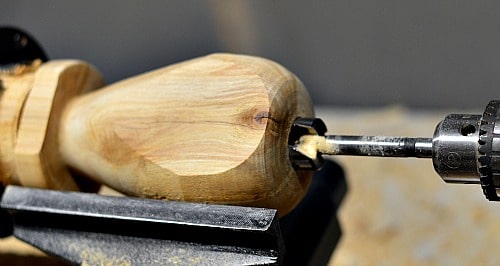
Drilling the center hole
I used a 1” forstner bit to make the center hole. I drilled into the vase as far as I could reach. Then I shaped the heart shape top of the vase.
I had a challenge turning the top of the vase and kept catching the edge of my spindle gouge. I finally managed to get a top that I was pleased with. At this point I re drilled the center hole to make it 3” deep.
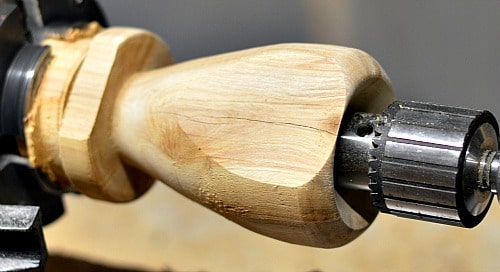
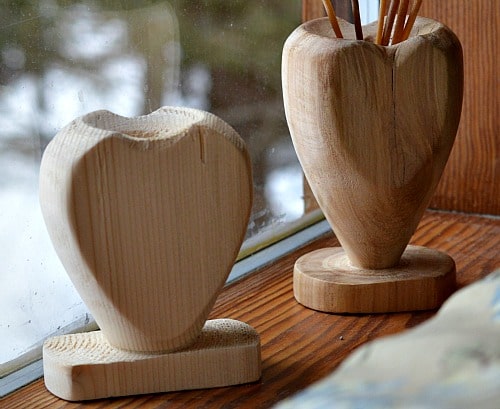
You can see that there is not much (if any) indentation at the top of the vase. This is because my wood was too thick. A narrower piece of wood (see image below) would show more of the heart shape.
Emphasize the Heart Shape
I used a carving knife to shape the center part of the heart.
The thinner the vase the more the heart shape stands out.
Finishing and sanding as appropriate
The sanding process is a bit more complicated. As the vase turns you are completely missing its flat side. Not only that but it is hard to have the sand paper in place to sand the round part as well as you hand is bouncing as the vase turns. You need to sand with each grit in turn both with the lathe on and the lathe off. Even the section you think you have sanded when the lathe is on needs to be sanded again with the lathe off.
If you apply a wax finish, like I did, then you need to apply the wax in the same way.
Production options
To improve the process of turning the vases you could try:
- Adding a jig to your jaws to give you extra support
- Turning the project in the round then cutting off the edges with a band saw. You will want a jig to help stabilize the cutting of the vase.
- Turning a tenon on the vase and insert it into a base that is turned separately
- Using an orbital sander to make the hand sanding part of the process go faster
- Turning softer woods, like dimensioned lumber, but painting the finished product
Marketing ideas
Weed pots, or this heart vase, are good products for your inventory. It can be simple to turn and finished quite simply. As a result you can have a low to mid-range priced product for your booth.
You can also embellish the vases to increase their value. Use two different woods, one for the base and the other for the vase. Use a close grained hardwood for the vase and a glossy finish as well. Depending on how you produce them these would be suitable for a farmers market or a gallery show. Be creative and enjoy the process.
Back to you!
I hope you have enjoyed this project. It is posted just before February 14th, Valentine’s day. With a few days left you could turn a heart vase for your sweetie. For the rest of the year you can turn weed pots in the shape of hearts and have more products in your inventory. Let me know how your vase turns out.
I encourage you to sign up for my newsletter (see side bar) and follow me on Facebook. Every day I post at least one turning project. See you later.


I was wondering if you could make the centre hole the size to fit a pill bottle or a film canister so that you could put live flowers in it instead of just dried flowers? What do you think? Would that work? Or be too complicated?
That is a great idea. Thank you.
I turned the hole in my heart vase a 1″ diameter to fit a stainless steel insert available from Lee Valley in Canada. A narrow container like a pill bottle or a film canister would also work. You can drill the hole any size you want. I would recommend using a blank that is at least a quarter inch or more wider so you have at least an eighth of an inch for the wall thickness.
I buy 1″ clear acrylic tubes from eBay to use as inserts for bud vases. They would work. Tip: turn your case and bore the hole for the insert then leave for a fortnight before putting the tube in. This lets the wood settle and dry. Sometimes the hole deforms and needs drilled out again. I’ve had tubes crack because I put them in too soon.
I have recently made some vases and used large test tubes to line them. The tubes were readily available on EBay and Amazon and you can get a variety of sizes. I used a forstner bit with an extension to drill 6″ into the vases and it really turned out well. The tubes I used were 6″ long and 1″ diameter. You can use these to make a single stem vase with a red rose especially for valentines day.