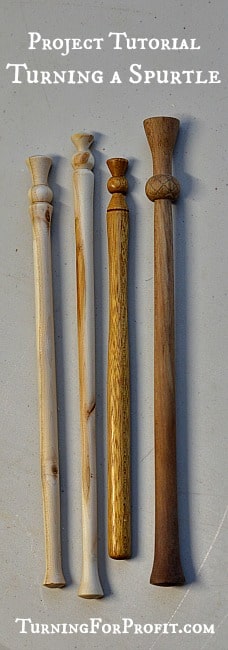
Wooden utensils have been around for ever. They are easy to make and great in the kitchen. Wood is super in the kitchen and won’t scratch those non-stick pots or pans. A spurtle is the Scottish name for a stick to stir porridge. Why Spurtle? I haven’t a clue, but it’s what I’ve always called it!
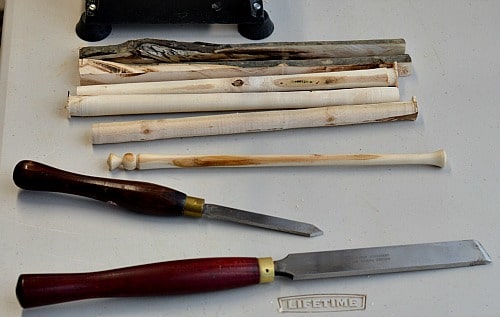
Wooden Utensils, like a spurtle, are easy to turn. I used only three tools; roughing gouge, parting tool and skew chisel. The wood for the spurtle is turned between centers and needs to be fairly straight grained. Wood that is about 1 inch in diameter would be good.
I had a couple of branches of Vine Maple that were long enough for spurtles and had some side branches that give character to the end result. I quartered the branches on my table saw very, very, carefully. You could also use a band saw to cut spurtle blanks.
Design Considerations:
I had two models on hand for my wooden utensils prototypes (the darker spurtles above). The stirring end was straight on one and flared on the other. The tops both included the Scottish symbol, a thistle. A quick search of Google images shows lots of different spurtle tops and shapes. It doesn’t have to be a thistle especially if you are not Scottish.
Wooden Spurtle Turning Process
-
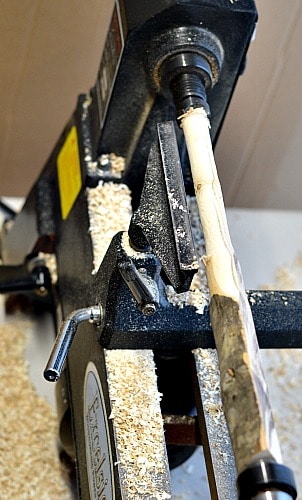
Turn the blank round between centers
Put a drive spur in your head stock, and a live center in your tail stock, and then mount your blank between them. I found the technique of turning the wood round with the roughing gouge to be different than the refined work with the skew chisel. It was quite quick to round out four blanks. You are not concerned about ridges or chatter as you are just getting your blank ready for shaping. I used a 1/8th inch parting tool to create a bit of space at the top of the spurtle. The parting tool allows me to get very close to the drive spur. It makes is easier to use the roughing out gouge without nicking the drive spur.
-
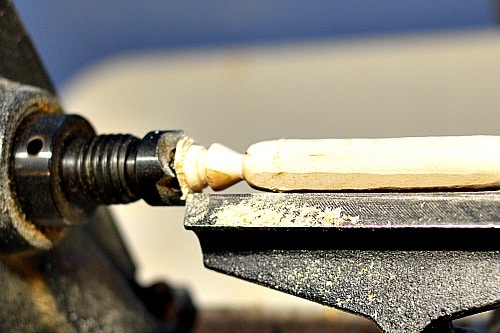
Shape the Spurtle with the skew chisel
Using the prototypes as a guide I did the initial shaping of the top and bottom of the spurtle. Make sure you have enough wood supporting the blank at both the head stock and tail stock. Don’t accidentally part off of the lathe too soon! This defines the stem of the spurtle for step 3.
-
Shape the stem of the spurtle
This is the trickiest part of the turning. Depending on the nature of the wood and how sharp your tool is you can get chatter and ridges on your turning. Don’t despair, step 5 will remove the imperfections. You may also need to slacken the pressure of the tail stock. You want the wood supported but not bent in the middle.
On these spurtles I was trying for a gentle taper from the top to the bottom. To get a smooth cut I used a skew chisel. Working from the areas shaped in step 2 I gently worked back and forth on the stem of the spurtle. Use either the heel or toe of the chisel, which ever works better for you.
I also tucked a finger on the outside of the spurtle to support the stem as I took very light cuts.
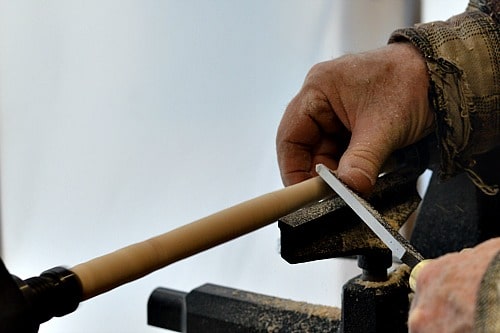
My results had little bumps or ridges that I could feel with my fingers. I stopped using the skew chisel when I had the right shape and size for the spurtle.
-
Finish shaping the top and bottom of the spurtle
Now that you have a good stem, finish shaping the top and bottom. Try for a flair that looks good on the bottom. Remember that one of my prototypes was straight so you could do that too.
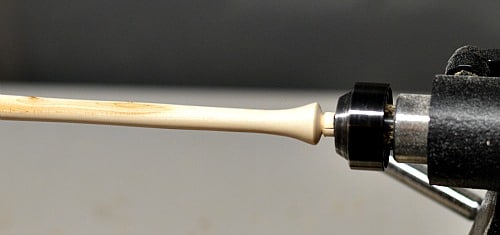
Shape the thistle or top decoration to suit your taste.
-
Sand the Spurtle on the lathe
As your technique improves you will have less sanding to do. On these thin, between center, turnings you will most likely have some ridges or spots that are not smooth enough. Sanding will get rid of these imperfections. Depending on how much you need to smooth you can start with a lower or higher grit. I started with 220 grit sand paper. It took me a few minutes to smooth out the spurtle to a satisfactory condition. My fingers tell me where the problems are. Don’t rely on your eyes. Move on to 320, 400, 600, and 800 grit sanding. Remember to wipe the spurtle down with a paper towel or soft cloth between each grit.
-
Apply a finish to your spurtle
I applied a food safe wood finish to the spurtle and buffed with a soft cloth.
-
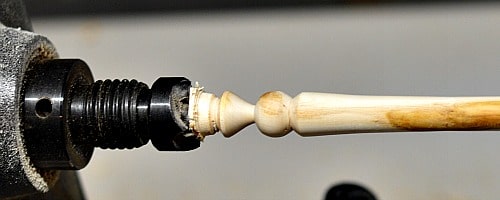
Part the Spurtle off of the lathe
I use my skew chisel to do the final shaping of the top and bottom of the spurtle as I part off of the lathe. This gives me a smooth finish.
I worked on the bottom of the spurtle first. Shape the bottom but don’t part all the way through. Move your tool rest to the top of the spurtle and shape the top decoration. I parted through the wood at this point. Use your free hand to “catch” the spurtle as it drops off of the lathe.
-
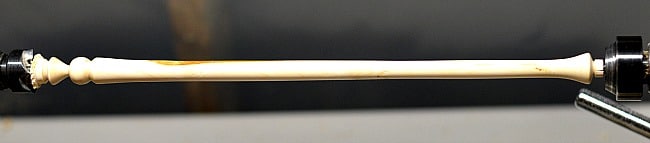
Sand off the top of the Spurtle
You are almost done. Use a knife to clean up the top and bottom of the spurtle then sand the top and bottom of the spurtle, going through the grits in progression as you did in Step 5. Then finish with what you used in step 6.
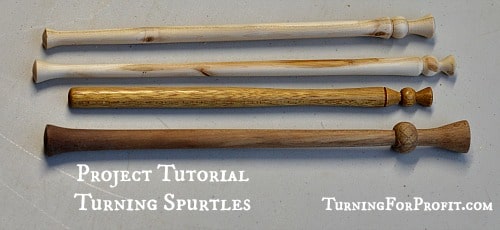
So that is how I turned a wooden Spurtle. A great little project that makes wooden utensils that are useful in the kitchen. The thistle goes up and the plain end does the stirring, which makes it easier to clean. Yes, I’m Scottish too!
Production Considerations
The making of a spurtle is straight forward with the opportunity to add your own unique flair and embellishments. Preparing the blanks and rough turning them round could be done as a production run. The wood could be pruned branches or 1″ square blanks from a prepared board.
However, it does take time to shape, smooth and finish a spurtle. Make sure all of your time is included in your pricing not just your turning time. This is one product that would not be suitable for wholesaling. Typically your wholesale price is half of your retail price and I think this is too tight for a good margin. Add a few other turned wooden utensils and you will have a product line for the kitchen.
Other Projects
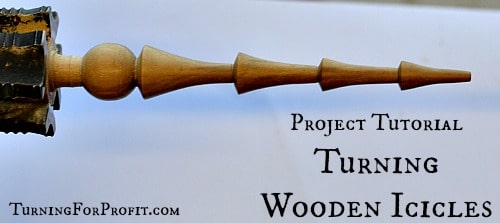
Here are a couple of other projects that are between center turning. A honey dipper is another kitchen utensil and wooden icicles are a wooden ornament. These two projects use shorter and about the same diameter wood. Happy turning.
Let me know how you make out. I would love to see what you have turned.
Thanks, Robin.


This is awesome!! I love my wooden utensils, they’re my favorite cooking tools and the idea of making my own is something I definitely want to do
Thank you for all the information! I just started turning a couple of weeks ago after wanting to learn for many years. I’ve made 16 spurtles and love it! I’ve made some from solid walnut and others with walnut and cherry that I laminated. I make all of them with the thistle top.
how do you keep them from going bad mine are getting dry and broken?
thank you
Hi Kim. I would start with a hard wood for the spurtle. The wood should be quite dry to start with. If your spurtles are breaking you might want to make them thicker and make sure you are not including knots that would become weak spots. Use a good food safe finish on them and keep them waxed up. Make sure you are not storing them in a hot place like beside the stove or above a wood stove. Hope these ideas help.