• Menu
  • Skip to right header navigation
  • Skip to main content
  • Skip to secondary navigation
  • Skip to primary sidebar
  • Skip to footer

Before Header

  • Facebook
  • Instagram
  • Pinterest
  • RSS
  • Twitter

Turning for Profit | Woodturning | Lathe |

Helping woodturners make more money

  • Blog
  • Projects
    • Library
      • Turned Bowls
      • Christmas Projects
  • Inspiration
  • Make Money
  • Woodturning Techniques
  • Workshop Expertise
    • Splinters
  • Shop
  • Blog
  • Projects
    • Library
      • Turned Bowls
      • Christmas Projects
  • Inspiration
  • Make Money
  • Woodturning Techniques
  • Workshop Expertise
    • Splinters
  • Shop
You are here: Home / Technique / Parting Tool – More versatile than you thought
Parting tool is versatile

Parting Tool – More versatile than you thought

By //  by Robin Leave a Comment

divider
This post contains affiliate links. If you use these links to buy something we may earn a commission. Thanks.

The parting tool is one of the first tools that most turners get with their lathe. The obvious purpose is to help you “part” the turning off of the lathe. However the tool is much more useful than just getting the wood off of the lathe. So let’s take a look at two different parting tools then move on to ways you could use your parting tool.

Typical Parting Tools

I started with a 1/8” wide parting tool. That is fairly thin. The metal of the tool is nice and solid and comes to a point. You can flip the tool and still work with it. The other parting tool is only 1/16” wide.  Because this is thinner the shape is changed to give the point more support. Two styles and sizes of parting tools 1/8" and 1/16" This is the tool to use if you want to save on your wood or (as is more likely in my case) I’ve not left enough room to use the wider parting tool! Sometimes you have to part the wood a good distance from your tool rest. If you are turning a box that is 4” in diameter then you need a tool strong enough to reach that 2″ from your tool rest. Both of these tools can do that easily. If you are parting in a good distance make the cut slightly larger than your parting tool, about 50% larger. So your 1/8” parting tool will need a cut about 3/16” wide. This will prevent the parting tool from binding and burning your turning while you are parting it off.Using the parting tool to make a honey dipper

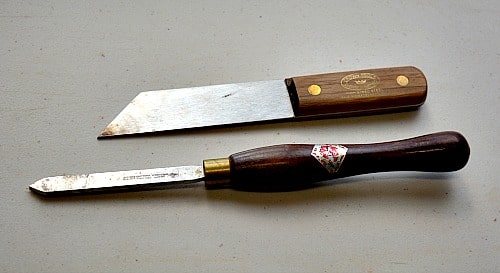
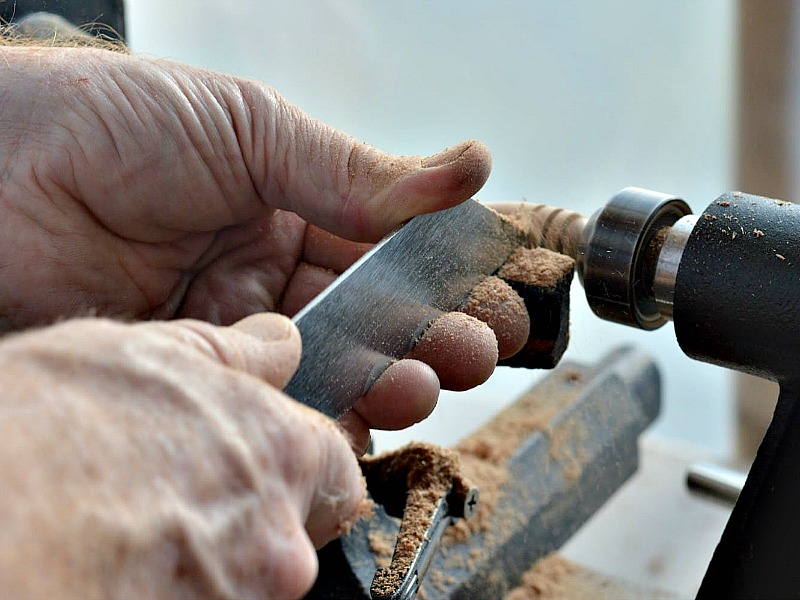
Cleaning up the ends of your spindle blank

Sometimes when you put rough wood on the lathe your ends are not square.  They can be on an angle or just plain uneven.  Using the parting tool to clean up the ends of your spindle helps keep your spindle balanced, your other cuts smooth, and a sharp or unexpected edge away from your fingers.

Parting wood off of the lathe between centers

Turning a fish bonker is a good spindle turning project with a good sized piece of wood. After shaping the bonker, sanding, and then finishing you are ready to part the project off of the lathe. As the drive spur and the live center are holding the wood securely you need to remove the wood at each end. So the goal is to make the nub of wood small enough to be easy to remove when it is off the lathe, but large enough to keep the wood spinning on the lathe as you part off the other end. Here is where to use the parting tool when you are spindle turning I make the tail stock end the smallest amount needed to keep the spindle turning. Then I work on the head stock side. (If you are nervous about your wood not being strong enough and you’re also not sure when it will actual part away then move between the two ends slowly making each end smaller.) Once you’ve made the tail stock as small as you feel comfortable with then complete the parting by cutting through at the head stock. Use one hand to hold the parting tool. The other hand is ready to “catch” the turning as the wood separates and comes off of the lathe. This may still leave you with a small piece of wood to clean up at the head stock end and a slightly larger piece at the tail stock. This method lets you part your spindle projects safely off of the lathe.

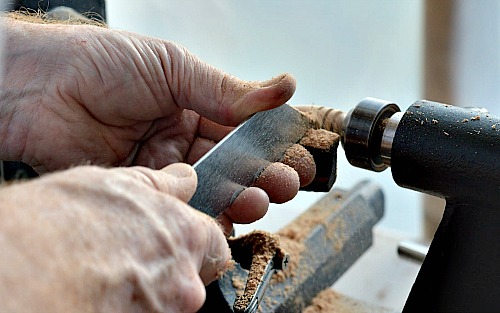
Parting wood held in a multi-jawed chuck

A multi-jawed chuck can grip your spindle turning without the tail stock for support. For safety reasons use the tail stock if you can. Once you completed as much of the project with the support of the tail stock then you can remove it. This leaves the tail stock end of your turning unsupported. If this is a small spindle and not too long you can then take a skew chisel and finish off that end of your project. The parting tool is only needed once when the turning is held in a multi-jawed chuck The advantage is that you can then use your parting tool to part the turning project completely off of the lathe at the head stock end. This makes finishing the turning much easier. You only have one end to sand and wax with no extra nub on the end to deal with.

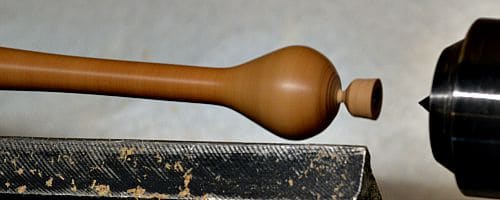
Making tenons with a parting tool

Tenons are very useful in turning. You can make tenons to fit into various sized chucks or you can turn tenons on projects that will fit together for the project. The 1/8” parting tool works best because you are making a wider cut with each use of the tool. For my multi-jawed chuck a 3/8” tenon gives me a good amount of wood to grab in my chuck and I know that three cuts of the parting tool give me that depth. When making a lidded box I turn a tenon on the bottom of the box. I use a parting tool to make the tenons on a lidded box

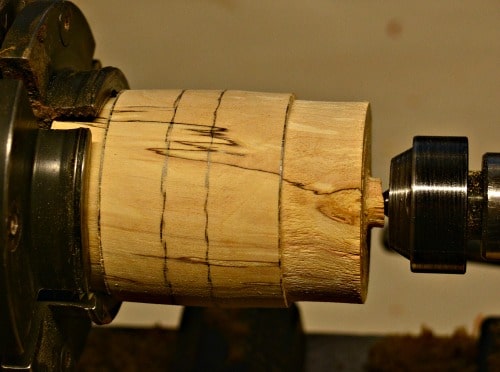
Turning lidded boxes

Turning a lidded box is a great turning project. The trick to this is the parting tool. You turn your blank round between centers on the lathe. On the bottom end you make a tenon with your parting tool. Then turn your blank round and figure out where you want the joint on your box to go. The parting tool is going to be used to separate the lid from the bottom of the box. When actually separating the two pieces don’t make your parting cut flush with the bottom. Move your parting tool away from the bottom just a smidge so you can see a small ridge. The parting tool makes the tenon, parting cut, and small ridge in a turned box So the distance between the lid and the bottom has to include three things: the tenon on the lid, (So make that straight using your parting tool) a space for the parting tool to cut / part between the two pieces, and leave a smidge more to help you when you are hollowing out your bottom so the tenon on the lid can fit in. Parting between the lid and bottom is where I would use the 1/16” parting tool.

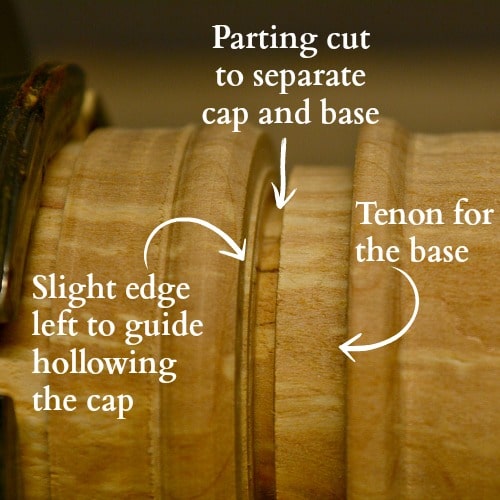
Parting off bowls and lids

When turning a bowl on the lathe and holding it by a tenon in a multi-jawed chuck the parting tool can be used to part the bowl from the lathe. Turn the outside of the bowl to your desired shape. Hollow the interior of the bowl and finish both sides of the bowl. When you are ready to separate the bowl off of the lathe take your parting tool and part it off. To make the bottom of the bowl flat, even with some wood movement, angle your parting tool towards the center of your bowl. Not a lot, you are not turning another bowl. Just a slight angle will give you a concave bottom that will allow your turning to rest steady on a table. Use the parting tool at a slight angle to make a concave base on a bowl Another place the parting tool helps is with making shawl rings or jar lids on your lathe. In turning a Mason jar lid you have to part off each lid. A large blank on a face plate can give you several lids at one time. To prevent burning make sure that you cut a space that is slightly larger than your parting tool. You need a deep parting cut to make a jar lid.

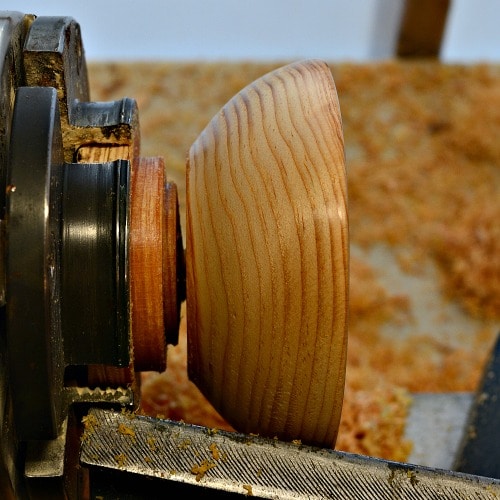
Decorative and functional use of the parting tool

This honey dipper has the slots on the dipper end made by a narrow parting tool. When turning the dipper you can shape the head and then use the parting tool or in the opposite order as well. These slots allow the dipper to hold more honey so in this case they are functional. A parting tool is needed when turning a honey dipper You can also use the parting tool to create interesting shapes by making slots for Christmas trees or vases. It is the same procedure as parting off the lathe just make sure you don’t go too far. I find that if I look down vertically over my turnings I can see the thickness of the center of the turning so that each slot goes for the right distance. A parting tool can create an interesting Christmas tree

Accuracy and placement with the parting tool

The parting tool is a precise width. This allows you to use the parting tool as a measuring device on your lathe. A half inch tenon requires 4 cuts with the 1/8” parting tool. A suggestion that came from the woodturning Entrepreneur Facebook group was to turn the 1/8” parting tool on its side. This gives you a very sharp point. Using the parting tool this way gives you a groove on your turning. This can be a measure of where you want to make your parting slots, or possibly a burn line on your turning. To make the groove move your tool rest away from your turning. Present the tool from the bottom side of your turning and slowly raise the tip to the spot you want to make your groove by lowering the handle. Don’t be too aggressive here you just want a mark on your turning. This is basically similar to using a scraper on your bowls. You want the cut / scrape to be made below center on the turning. Using a parting tool to make a groove. Present the tool below center to prevent catches How have you used your parting tool? Some turners who are into miniature turnings will use the parting tool like a small skew chisel just in case you need more ideas!

Turning For Profit

A parting tool is one of the easier turning tools to use.  As you saw above you can use it in a variety of ways.  If you are just starting out turning wood have a look at my Woodturning Blueprint book.  It introduces the tools you need to turn and suggests seven progressive projects to help you build your turning skills.  There are also business information included for each project.  Once the turning bug has bit you will have more products than you know what to do with.  Turn to the Woodturning Blueprint for some business advice to get you started in the right direction. Standing at the lathe using my thin parting tool.  Face guard removed to reveal the turner! I love wood turning and sharing with you.  Thank you for letting me join you on your woodturning journey.  Have fun and remember to always turn safely.  

Filed Under: Technique, Workshop Tagged With: beginner turners, turning techniques, turning tips, wood turning

Related Posts:

You may also be interested in these posts:
Christmas Projects Title

Christmas Ornaments: Build Your Inventory Fast

Turning Blanks: How to cut dimensional lumber on your table saw to make turning blanks

Turning Blanks from your Table Saw

Shop notes are a great aid in your woodturning projects

Woodturning Shop Notes

Woodturner Shop Safety

9 Shop Safety Tips for Woodturners

Before you start teaching woodturning to children ask yourself 3 important questions

Teaching woodturning to children – 3 preliminary questions

Setting up your lathe to secure your wood

How to secure wood to your lathe

Previous Post: « A fish bonker ready for use Fish Bonker – A Woodturning Project
Next Post: Muddler – A woodturning project A muddler to mix the fruit and herbs in your cocktails »

Reader Interactions

Leave a Reply Cancel reply

Your email address will not be published. Required fields are marked *

CAPTCHA
Refresh

*

Primary Sidebar

Welcome

About me:

Welcome to the Turning For Profit Community! I'm Robin. Turning for Profit is about helping you find hope and joy in your woodturning hobby. It's about projects that fill your inventory and inspire your creativity. It's business help to get you set up and making a profit quickly. If you've always wanted to work from home playing with wood, let me help you realize your dream of Turning for Profit. Read More…

Help for Beginner Woodturners

Learn to use 5 different wood turning tools, with confidence, while you turn 7 projects, building your wood turning skills sequentially.  Includes tips and ideas for marketing your wood turning, when you are ready to move forward.


Footer

Inspiration:

You don’t have to be good to start.  You just have to START to be good. — Joe Sabah

Handmade with Care Stamp

7 Gifts for Men Made on the Lathe

7 Gifts for Men Made on the Lathe
Christmas Projects Title

Christmas Ornaments: Build Your Inventory Fast

Christmas Ornaments: Build Your Inventory Fast
Finished Niddy Noddy with yarn.

Niddy Noddy – A Woodturning Project

Niddy Noddy – A Woodturning Project
  • Start Here
  • About me
  • Contact
  • Privacy Policy
  • Terms and Conditions
  • Disclosure

Site Footer

  • Email
  • Facebook
  • Instagram
  • Pinterest
  • RSS
  • Twitter

Copyright © 2025 · Mai Lifestyle Pro On Genesis Framework · WordPress · Log in